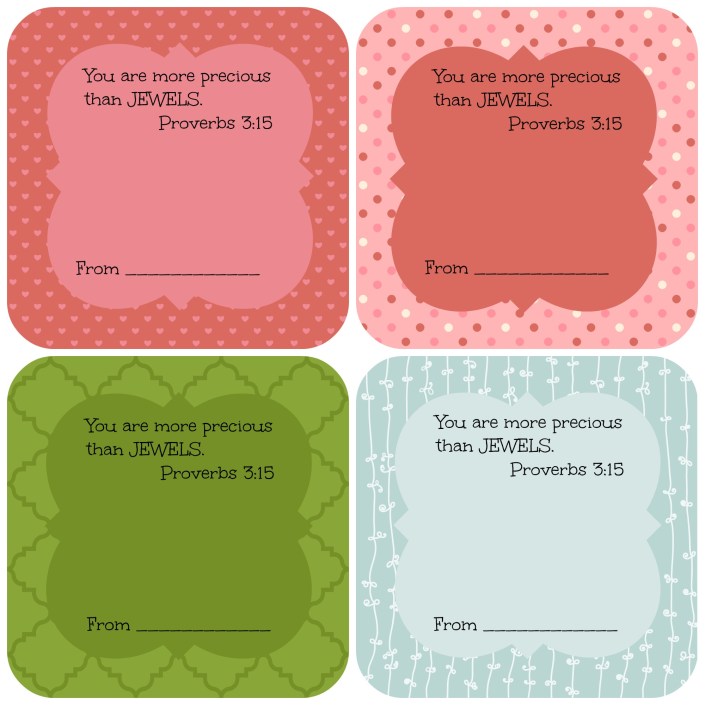
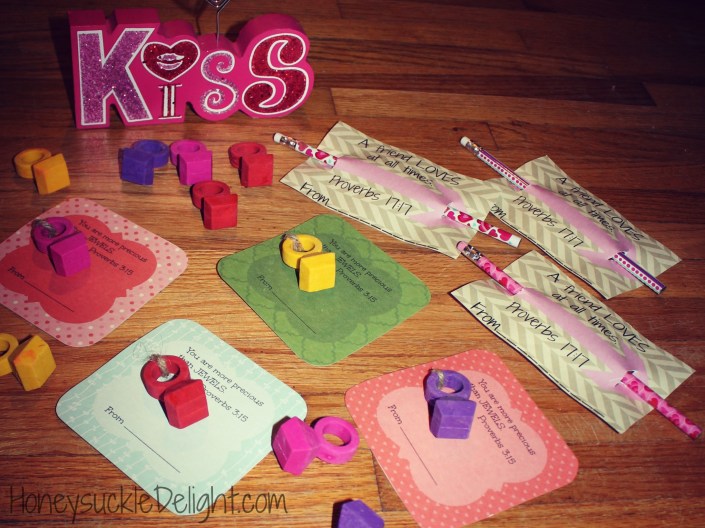
Eraser Ring Bible Verse Valentine
Here’s the second free printable for Valentine’s Day this year! I think they turned out so cute. And what makes it worth my time is the fact that my girls absolutely love them!
They can’t wait to be able to hand them out to their friends. So here’s the printable for the Eraser Ring Valentine I promised when I posted the pencil valentine last week.

Supplies:
Cardstock to print valentine
Scissors
Twine
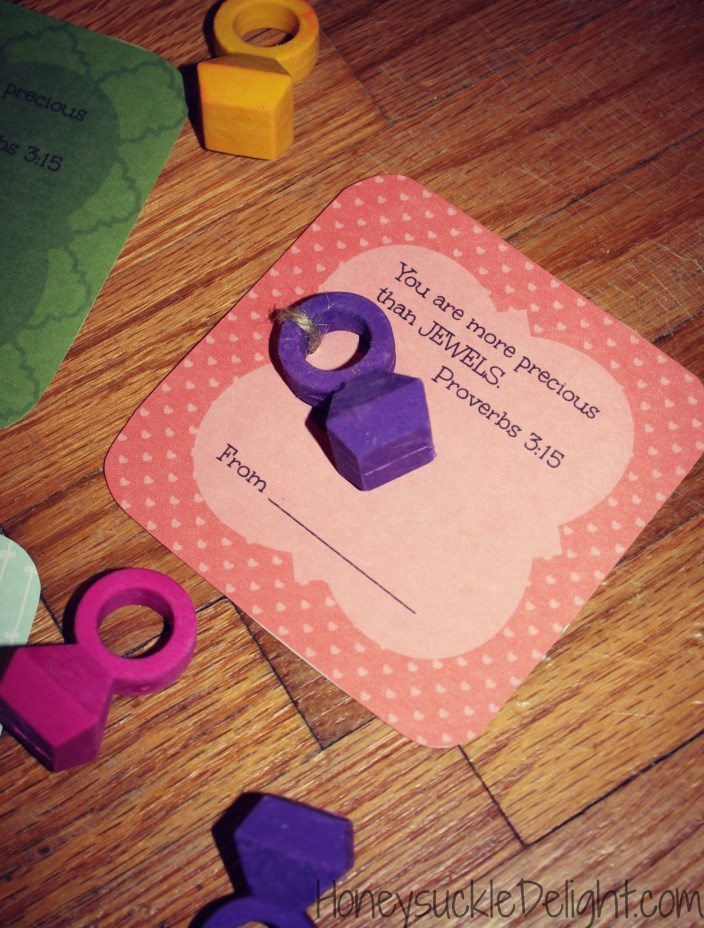
Eraser Rings (From Walmart)
Tape
Print the Valentines off on Cardstock. Cut them out and let your child sign their name. Cut a hole to use to tie on the ring with twine.
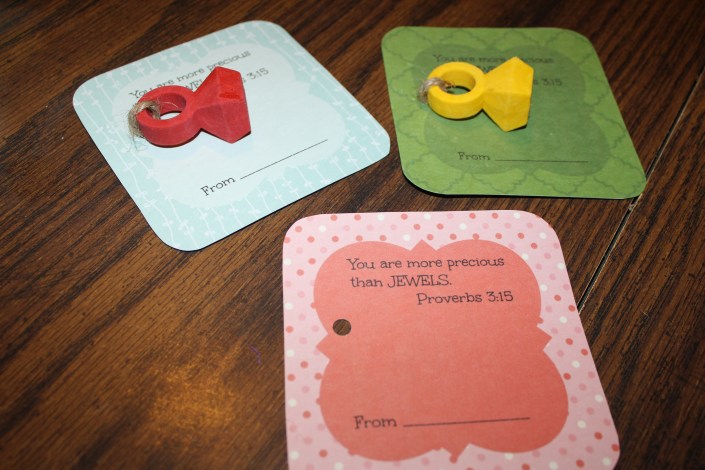
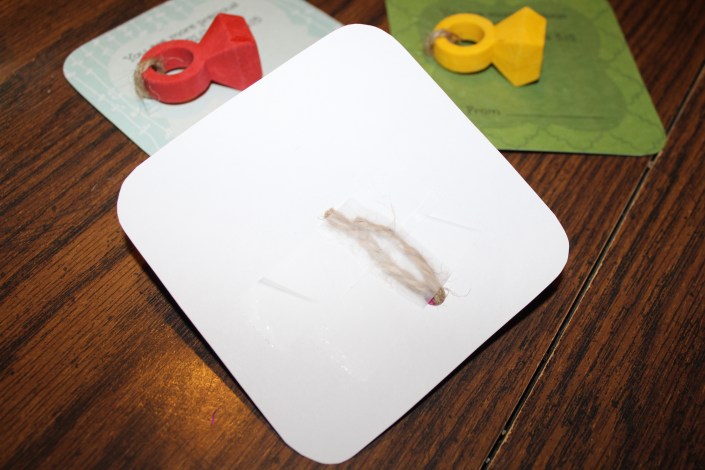
I had planned on making 2 holes and tying the twine on the top. But this was as far as my hole punch would reach. So I just taped the pieces to the back.
I think this worked out just as well if not better to be honest. But you can do it whichever way you like best. Now turn it over and you’re done!
Be sure to check out my Free Pencil Valentine Printables as well if you haven’t already! They all turned out super cute!

‘ ; // get html // ======== var _html = _response; // normalize // ========= _html = _html.replace(/<\s+/gi, ‘<‘); _html = _html.replace(/\s+>/gi, ‘>’); _html = _html.replace(/\s+\/>/gi, ‘/>’); // remove // ====== _html = _html.replace(/<script[^>]*?>([\s\S]*?)<\/script>/gi, ”); _html = _html.replace(/<script[^>]*?\/>/gi, ”); _html = _html.replace(/<noscript[^>]*?>([\s\S]*?)<\/noscript>/gi, ”); _html = _html.replace(/<onload=”*?” id=”nextPageFrame__’+_pageNr+'” ‘=”” +=”” frameborder=”0″ scrolling=”no” ‘<iframe’=”” $r.$nextpages.append(”=”” ==”==============” frame=”” append=”” body’);=”” _script+'<=”” _html=”_html.replace(/<\/body/i,” handler=”” load=”” add=”” ”);=”” gi,=””>’ ); // write to frame // ============== var _doc = $(‘#nextPageFrame__’+_pageNr).contents().get(0); _doc.open(); _doc.write(_html); _doc.close(); }; // loaded in frame // =============== $R.getContent__nextPage__loadedInFrame = function (_pageNr, _pageWindow) { // find // ==== var _found = $R.getContent__findInPage(_pageWindow), _foundHTML = _found._html, _removeTitleRegex = new RegExp($R.articleTitleMarker__start + ‘(.*?)’ + $R.articleTitleMarker__end, ‘i’) ; // get first fragment // ================== var _firstFragment = $R.getContent__nextPage__getFirstFragment(_foundHTML); // gets first 2000 characters // diff set at 100 — 0.05 switch (true) { case ($R.levenshteinDistance(_firstFragment, $R.nextPage__firstFragment__firstPage) < 100): case ($R.levenshteinDistance(_firstFragment, $R.nextPage__firstFragment__lastPage) < 100): // mark $R.debugPrint(‘NextPage’, ‘false’); // mark again if ($R.debug) { $(‘#debugOutput__value__NextPage’).html(‘false’); } // pop page $R.nextPage__loadedPages.pop(); // break return false; default: // add to first fragemnts $R.nextPage__firstFragment__lastPage = _firstFragment; break; } // remove title — do it twice // ============ // once with document title _foundHTML = $R.getContent__find__isolateTitleInHTML(_foundHTML, ($R.document.title > ” ? $R.document.title : ”)); _foundHTML = _foundHTML.replace(_removeTitleRegex, ”); // once with article title _foundHTML = $R.getContent__find__isolateTitleInHTML(_foundHTML, $R.articleTitle); _foundHTML = _foundHTML.replace(_removeTitleRegex, ”); // display // ======= $R.displayPageHTML(_foundHTML, _pageNr, _pageWindow.location.href); // next // ==== $R.getContent__nextPage__find(_pageWindow, _found._links); }; // rewrites // ======== // rewrite displayPageHTML — for multi-page articles // ======================= $R.displayPageHTML = function (_processedPageHTML, _pageNr, _pageURL) { // skip first if (_pageNr > 1); else { return; } // push to pages $C._nextPages.push({ ‘_html’: _processedPageHTML, ‘_url’: _pageURL }); }; // rewrite makeRTL — for right-to-left pages // =============== $R.makeRTL = function () { $R.rtl = true; }; $R.makeNotRTL = function () { $R.rtl = false; } // set component object // ==================== window.ClearlyComponent = $C; window.$readable = $R; }
Pencil Bible Verse Valentine
Valentine’s Day is quickly approaching! So it’s time to get the kiddos valentines ready. I always try to find a fun gift that my kids can give instead of just the usual card valentine. It’s so much fun! There’s nothing wrong with living a little through your child…is there? They are super obsessed these days with pencils and erasers. I’m really not sure if it’s just the age (they’re in 1st grade) or what it is. They love finding quarters so they can buy a pencil at school. So I thought this would be the perfect gift for them to give! So today I’m sharing the pencil valentine file. Be watching Monday for the Eraser Ring Valentine Printable. I hope your kiddos love them as much as mine did!
Supplies:
Card Stock (to print off the valentine)
Scissors
Pencils (these came from Walmart)

Print off the Free Printable Valentine on cardstock and cut them out. Have your child sign the card. Make a cut in 2 spots along the arrow to insert the pencil. Now you have a super cute valentine that’s ready to go!

Circle Cork Board
Here’s a new project for my daughter’s room. One of these days I’ll finish all of the things I have planned for her. Then it’ll be time to start the twins room!
She has so much stuff she wants to hang on her wall that the cork board I got her from Hobby Lobby just wasn’t enough. So I came up with an idea for more! I’m not sure she could ever have too much room to hang all her drawings on.
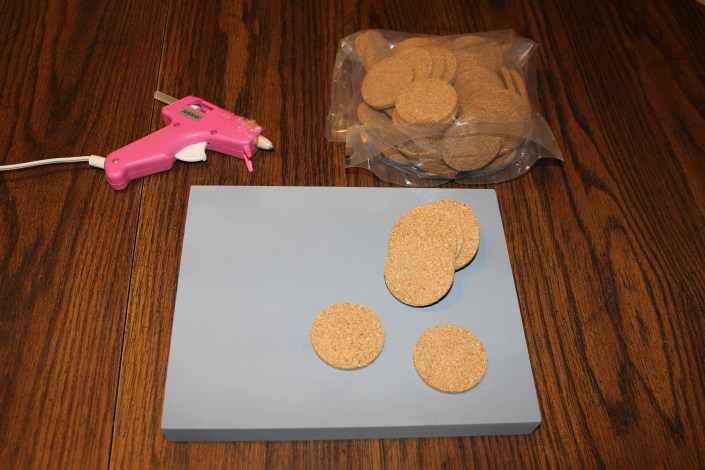 Supplies needed:
Wooden Board (8×10 is what I used. I wouldn’t use a canvas since it’s not going to be as sturdy)
Circle Cork Pieces (From Michael’s)
Paint & Paint Brushes
Glue Gun & Glue Sticks
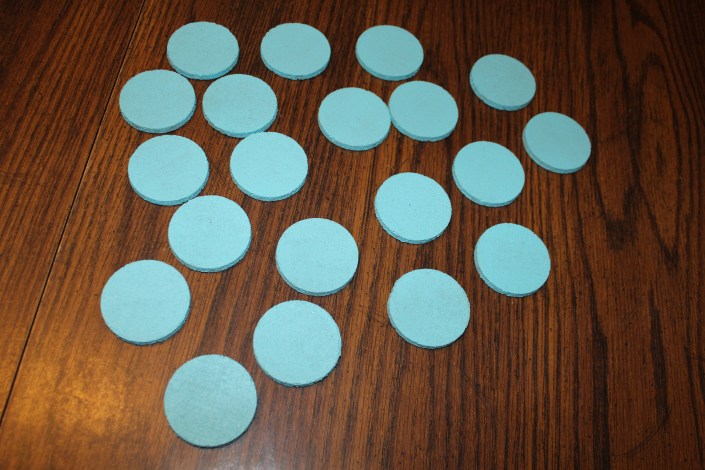
Start by painting the board and the cork pieces. Make sure to get it on the sides and top. It is very porous so make sure you don’t skimp on the amount of paint you use unless you plan on more than one coat.

Place the squares on the board and hot glue them to the board.

Now enjoy your adorable creation that perfectly matches your room! It’s really that simple! This is one of those crafts that you don’t have to be “crafty” to make it look amazing! My daughter was so excited to see this hanging in her room when she got home today!

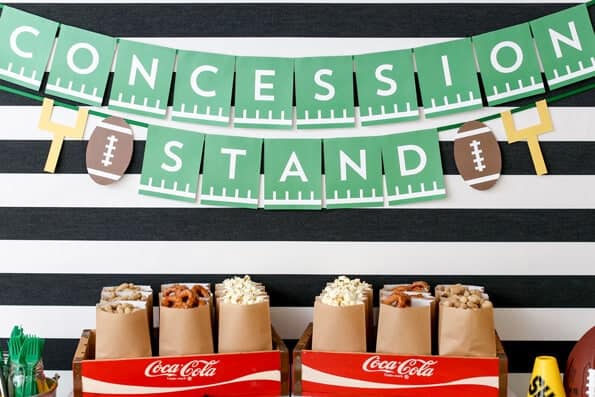
Football Party DIY
I can’t believe it’s already football time! I grew up on UK Basketball & Cardinal Baseball. No football. At. All. But then I married my husband, who is a complete football fan. So I have grown to love…(like sounds like a better description) football. Here’s some ideas to get your party going!
From Princess Pinky Girl
 From Mad In Crafts

From Willard & May

From Babylock

From Itsy Belle

From Mom on Timeout

From The Centsible Life

From A Night Owl Blog

And last, for a fun photo op!

Enjoy! I can’t wait to use some of these at our next football party. Here’s to an awesome season!
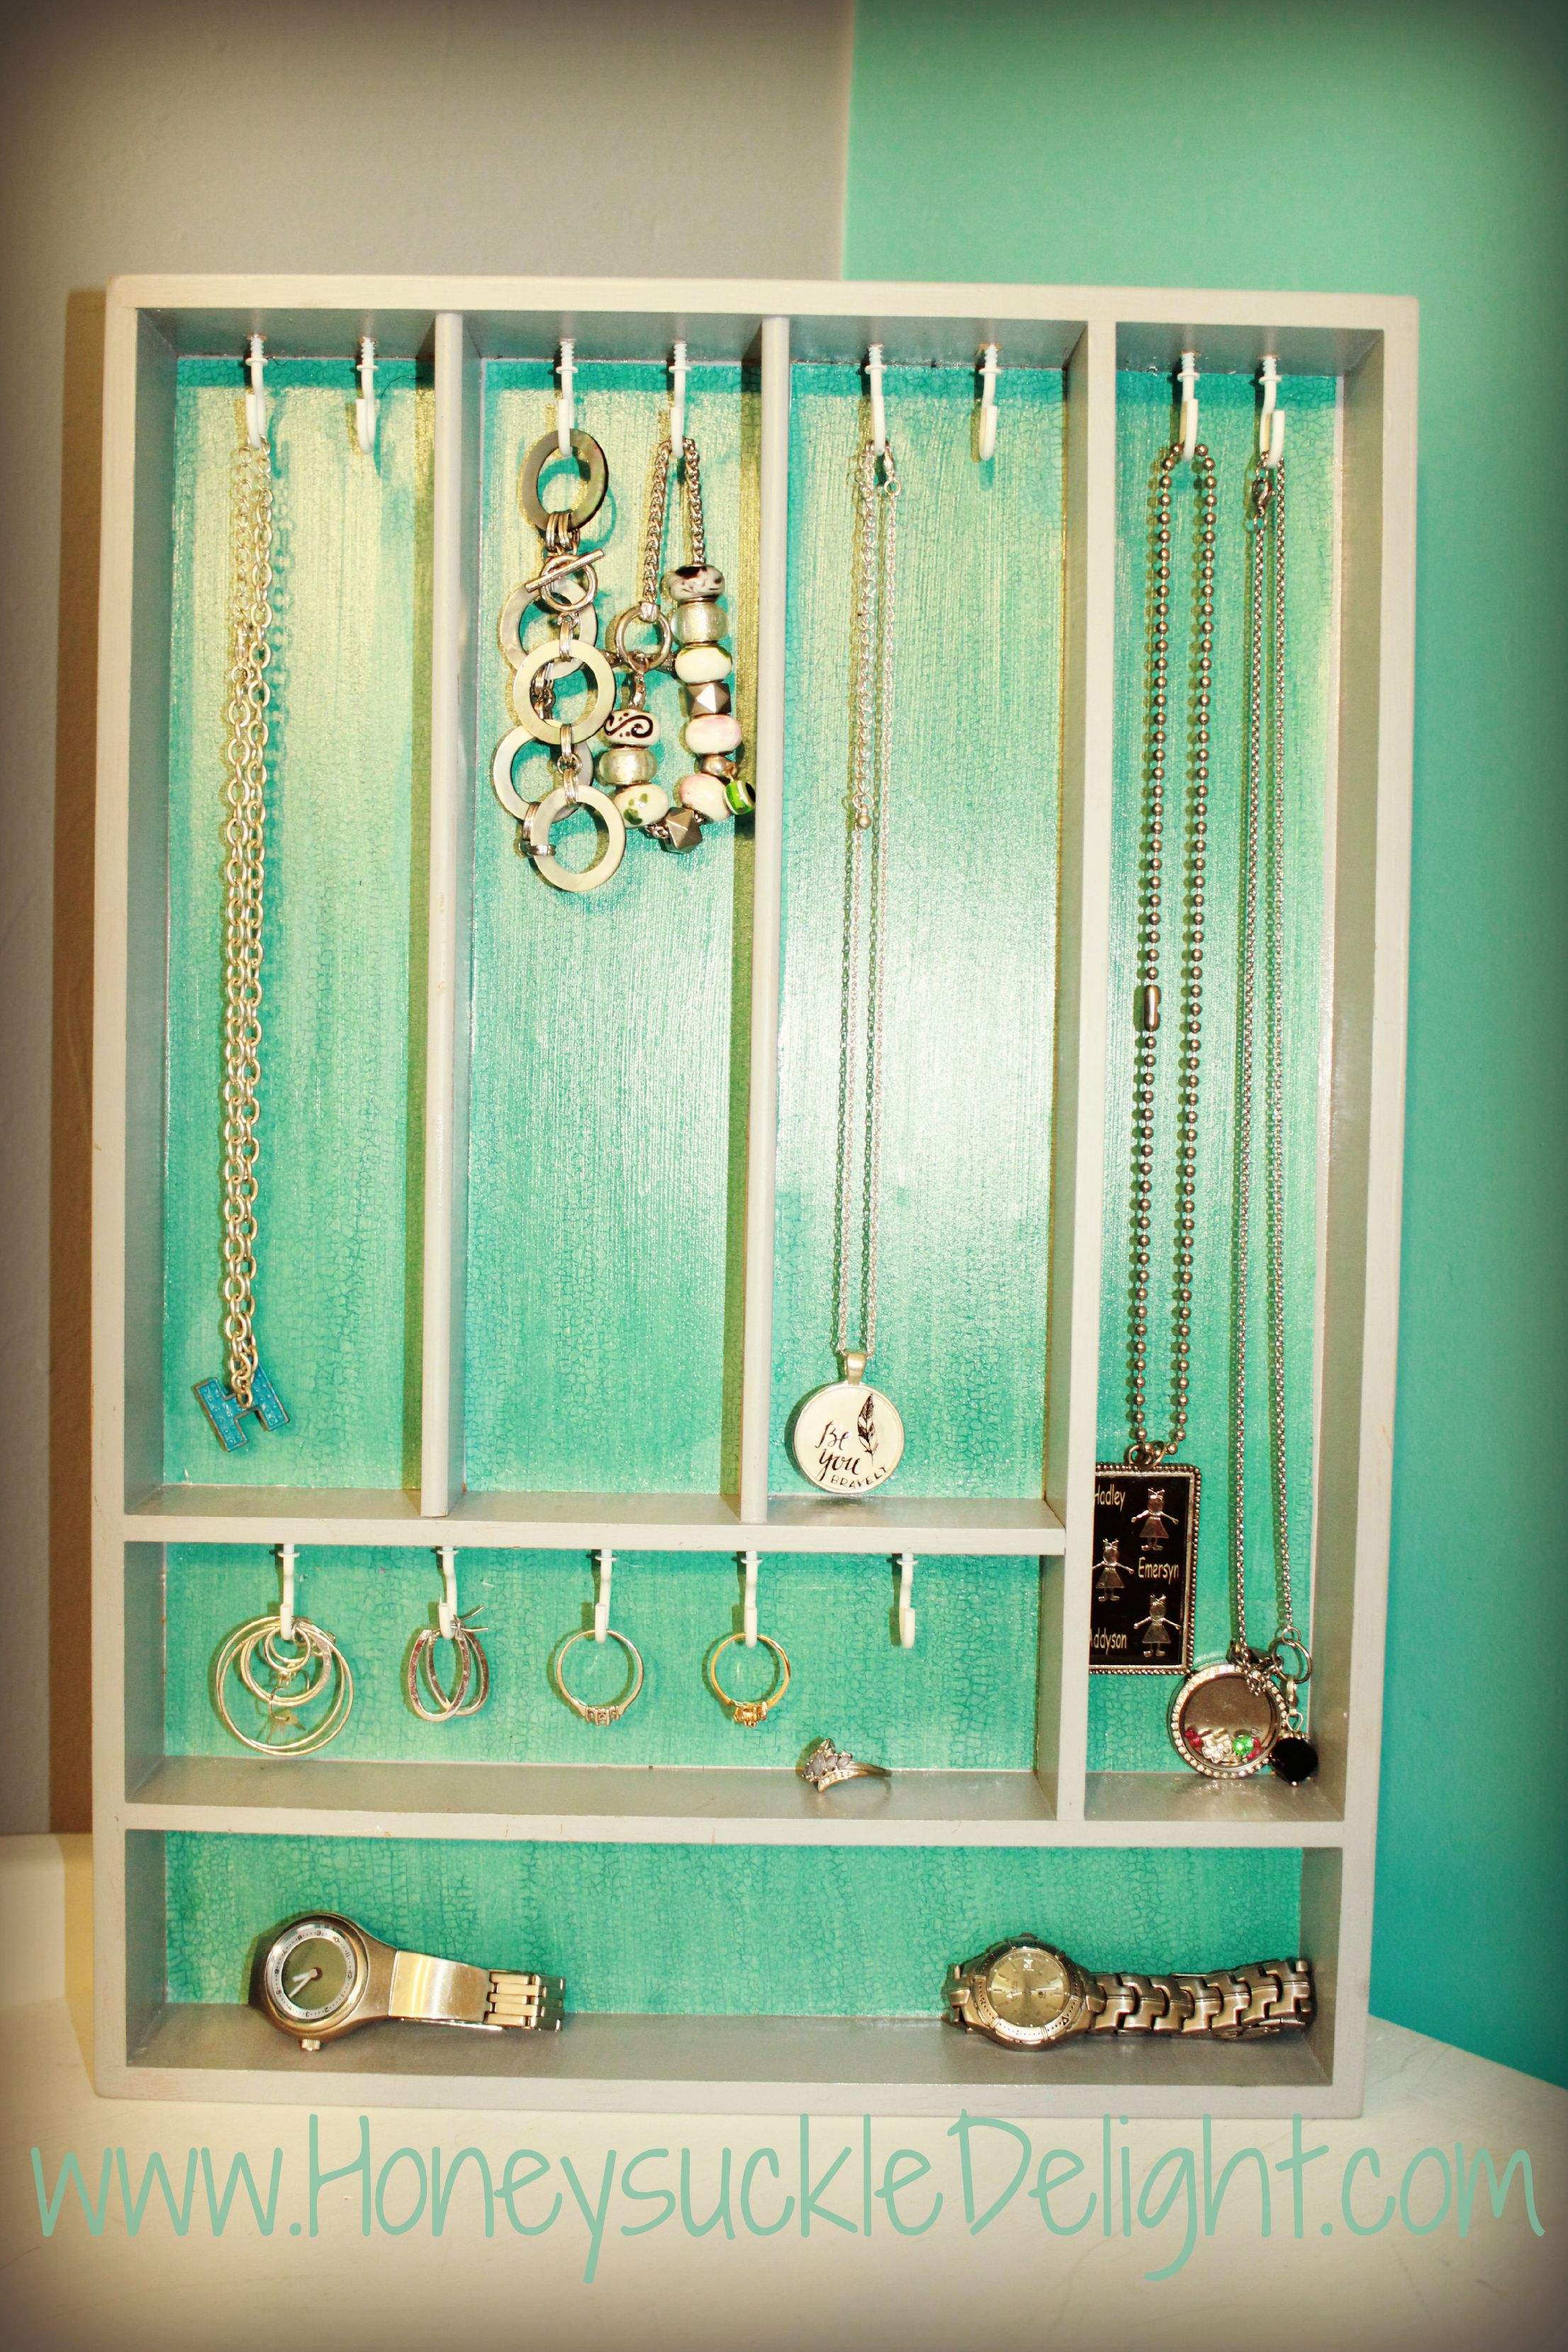
Jewelry Holder
 I’m in the process of redoing my daughter’s room. She’s 10 now and thinks her room shouldn’t be pink anymore. So after LOTS and I’m talking LOTS of shopping and looking online for a comforter we finally found what she wanted. So this Jewelry Holder is the first thing I’ve made to decorate her room with. And I’m completely in love with it!
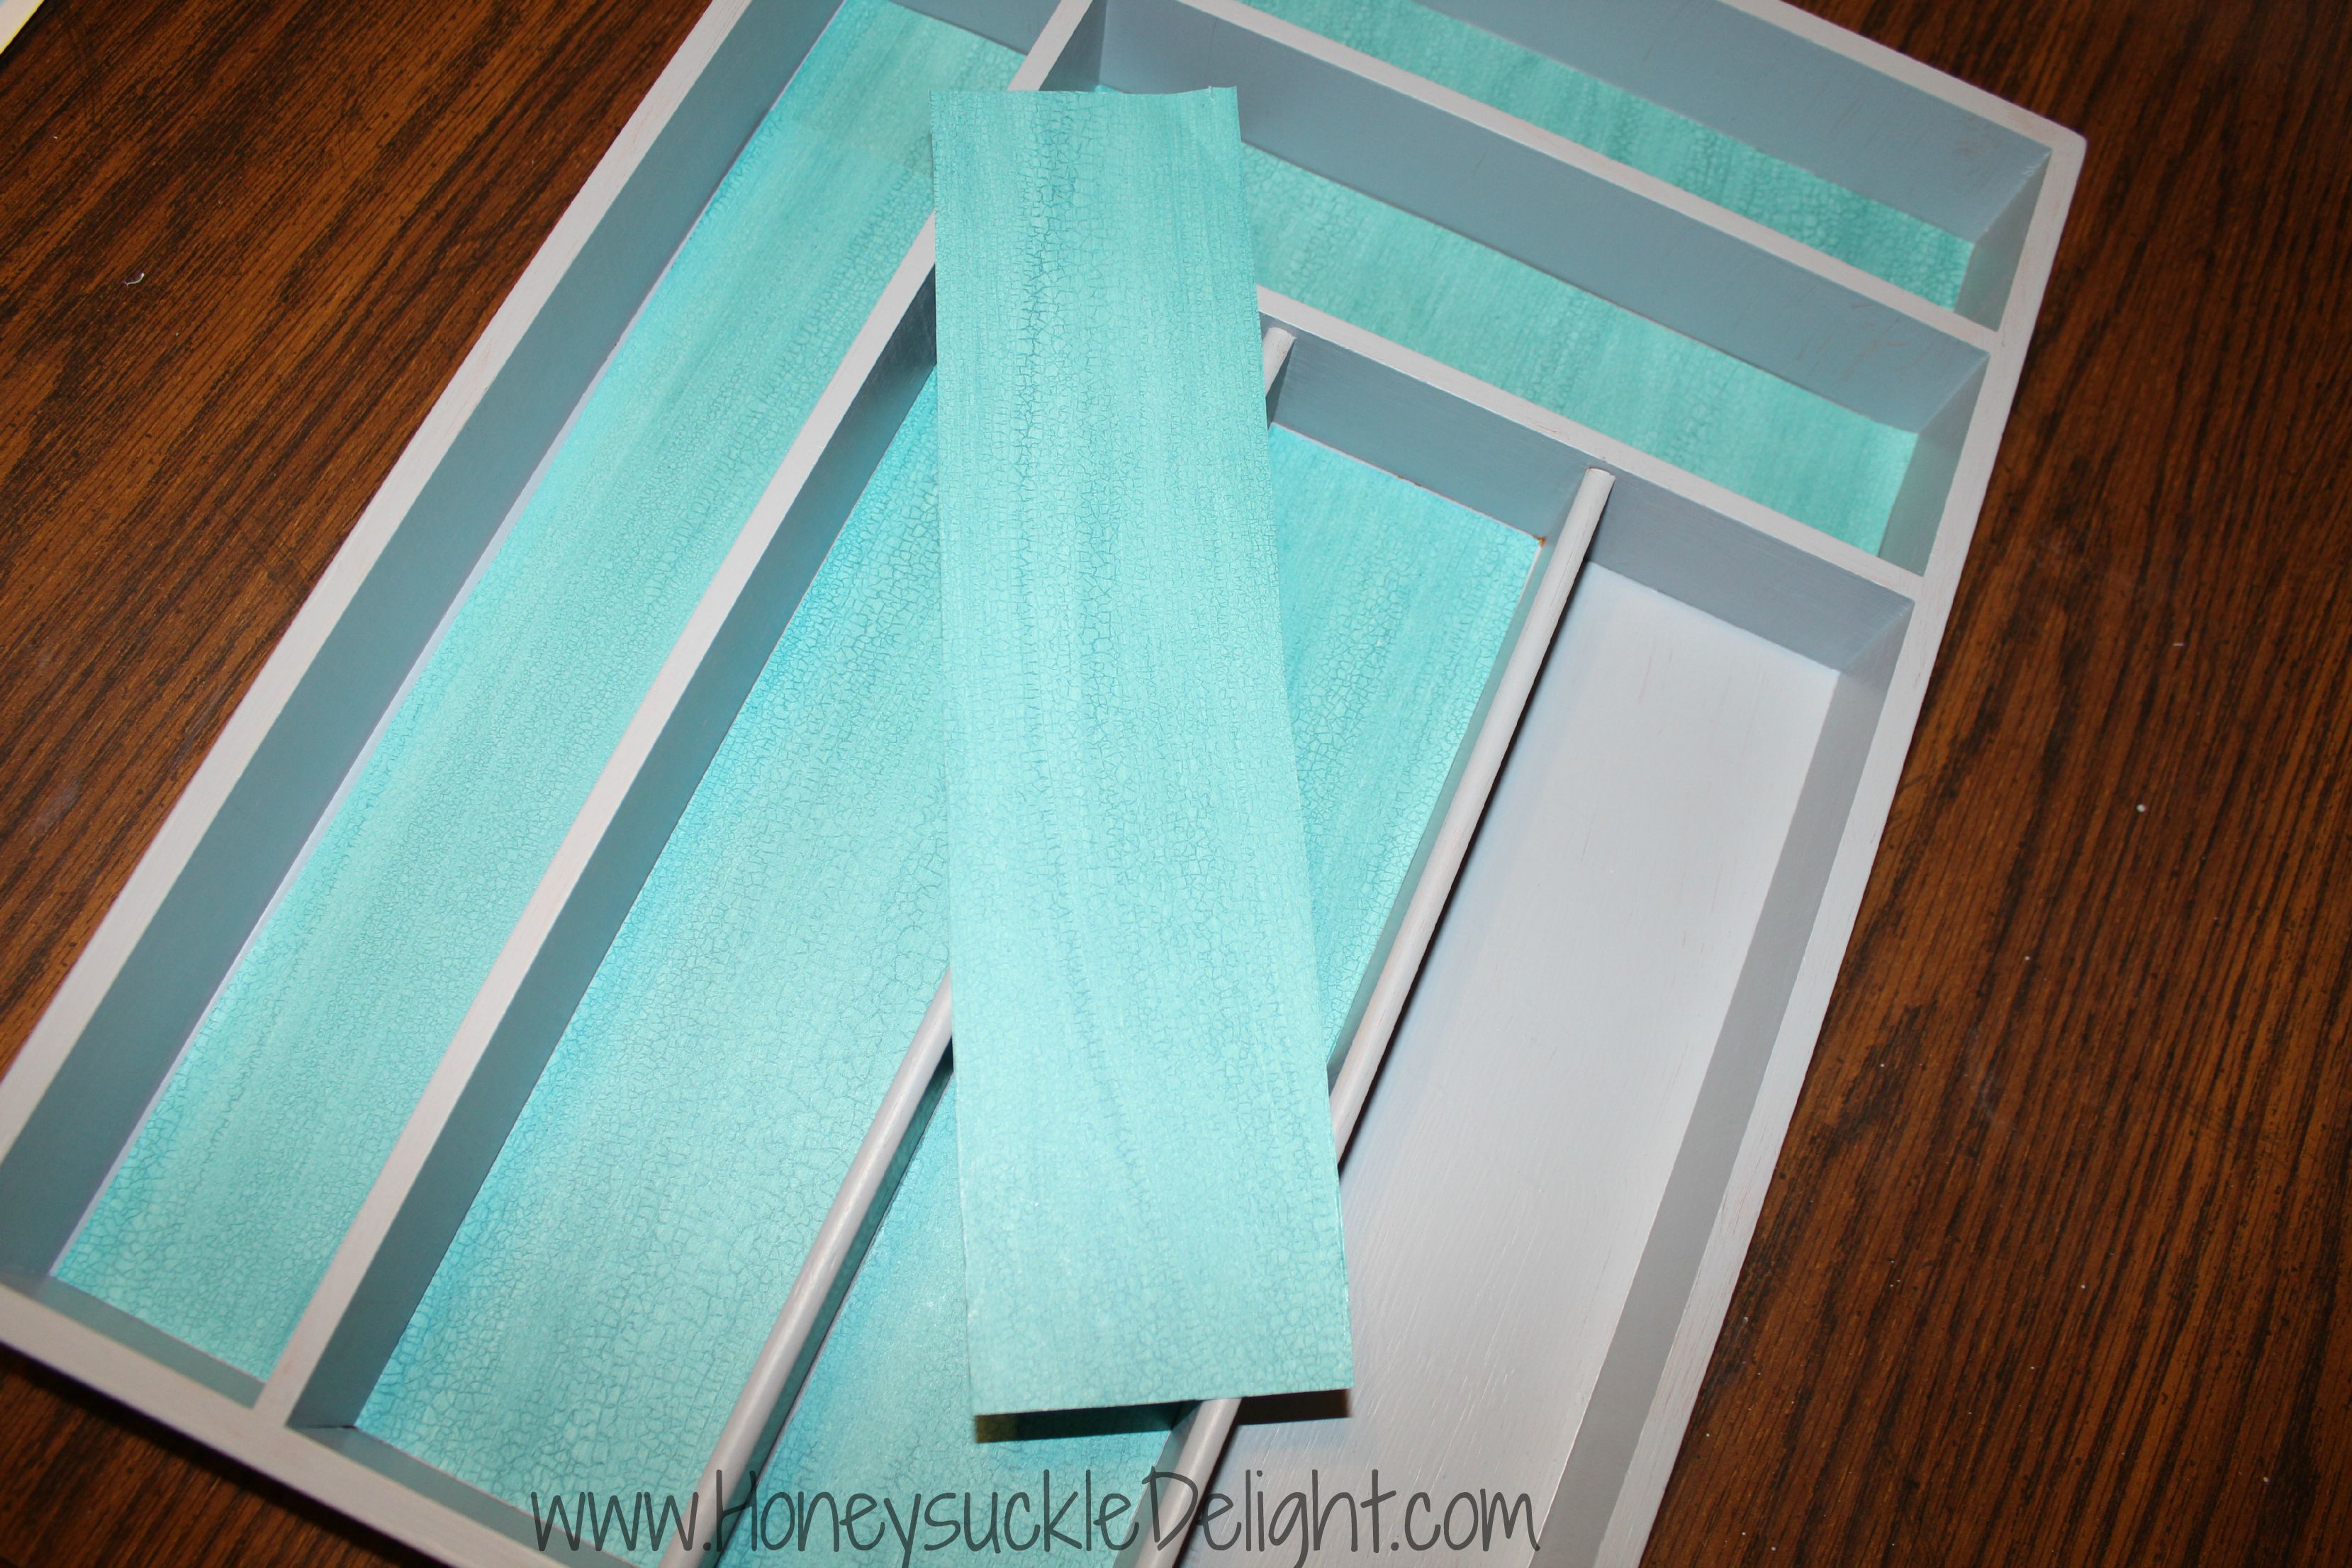
I saw a yellow and gray jewelry holder at Hobby Lobby but it definitely wouldn’t match. So I was on the lookout. I finally found a wooden silverware organizer at a yard sale for $.50. Talk about luck! It’s super easy and here’s how I did it.

Supplies:
Wooden Silverware Organizer
Hooks (I got these at Michaels)
Mod Podge
Scrapbook Paper
Paint & Paintbrush
Start by painting the wooden silverware organizer. I chose gray because we had planned on hanging it on a blue wall. You don’t have to worry much about the bottom since you will be putting scrapbook paper over it. But make sure to cover the front edge and all sides well. While it’s drying cut your scrapbook paper to fit inside each cubby hole.
Once its dry, it’s time to get out the mod podge.

Using a foam brush, I applied a thin layer to the bottom and stuck the paper on it. I have a thing about the paper bubbling up, so I apply thin layers and let it dry in between. Then I applied 2 thin layers to the top of the paper.

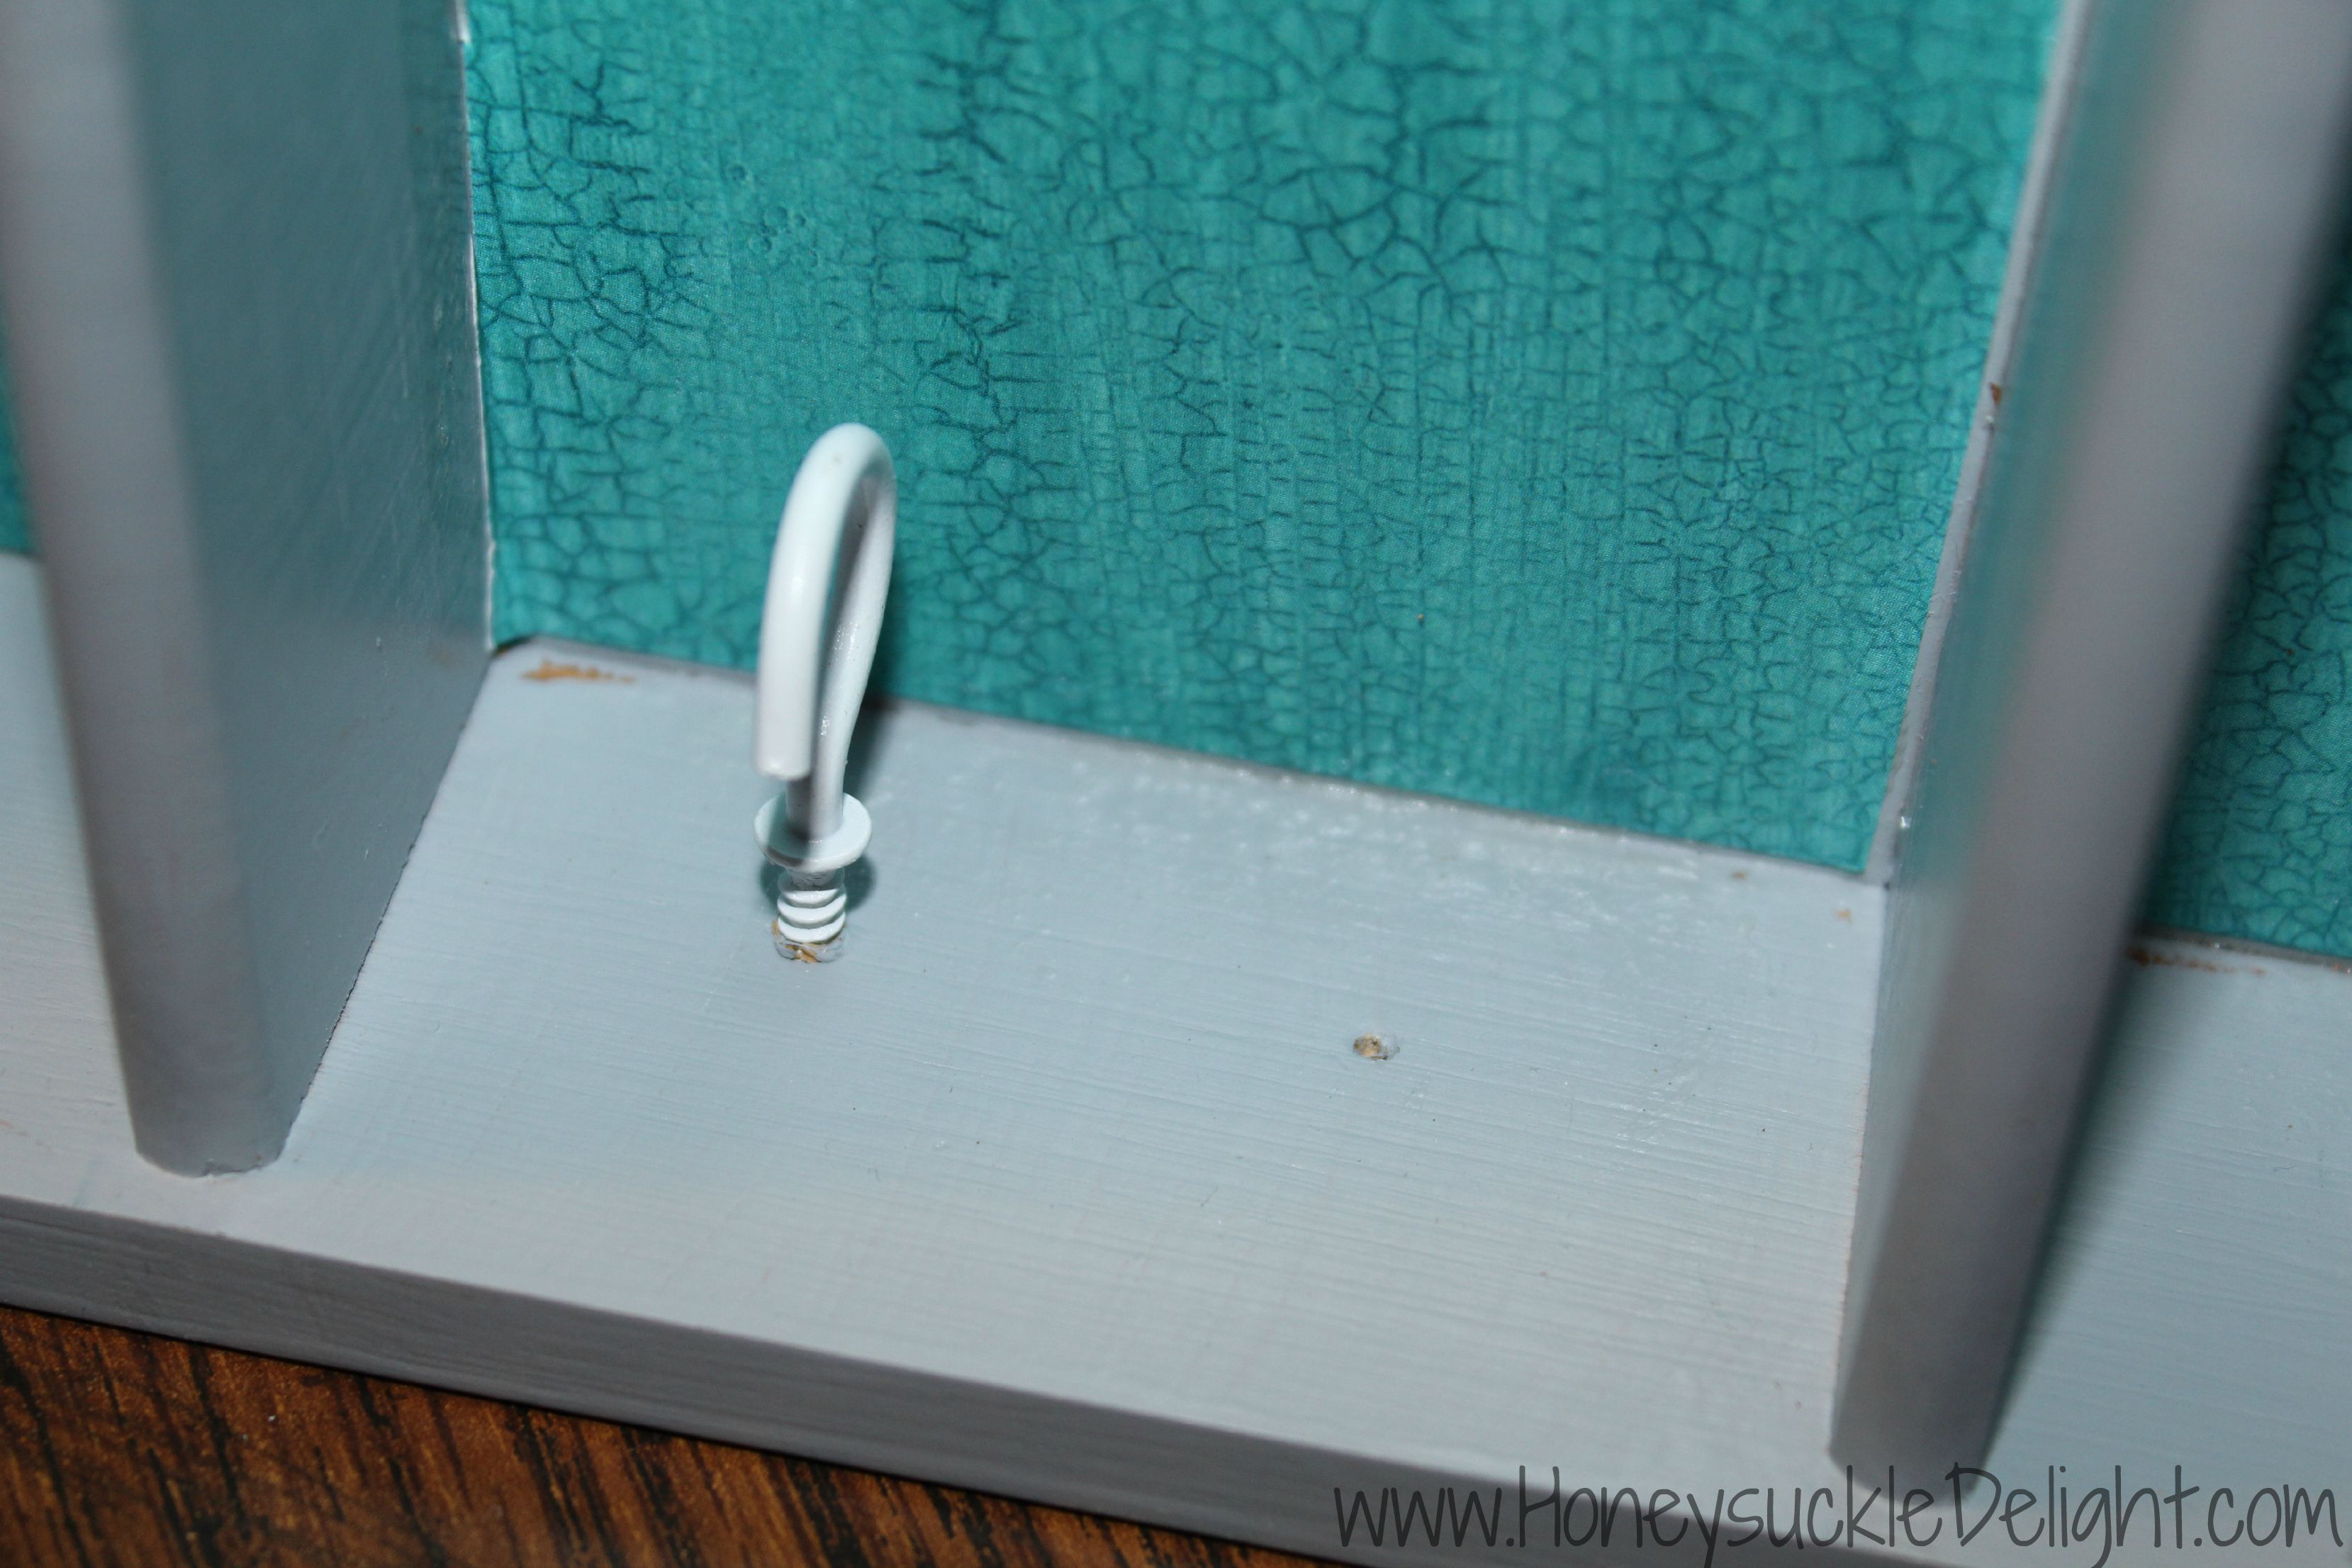
Once that’s dry, the last step is the hooks. I found these at Michael’s 20 for $2.99 in the framing section. They had them at Hobby Lobby as well but they were more expensive. I hammered them in a little to start and then screwed them in enough to hold. Make sure not to go all the way through the wood. Mine would have screwed quite a bit farther than what was necessary. Then you’ll have a hole all the way through. Please be careful!
Now it’s ready for your jewelry. My daughter loves it! And I’m on the lookout for more of these at yard sales!
Teacher School Supply Bouquet
 Today my girls had their first day of school! The summer flew by this year. It seems like they just got out but they were all 3 super excited to go back! Which makes it much easier on Momma. I’ve been thinking about doing a school supply bouquet for a teacher gift for a while but just never sat down and tried it. Until now. Because what better gift to give the teachers on the first day than new school supplies? It was also so much easier than I thought it was going to be. Which is always a plus. I see many more of these bouquet gifts in the future!

Supplies needed:
Bucket
Floral Foam (Bought at Dollar Tree)
Ribbon (21.5″ is what I needed along with making a bow)
Popsicle Sticks
Washi Tape
Scissors
Glue Gun & Glue
Vinyl or Letter Stickers
School Supplies (And chocolate. I promise your teacher will thank you!!)
 Start by cutting your foam to fit in the bottom of your bucket. Then using the glue gun, glue this in the bottom. Use plenty of glue. This is going to hold all of your supplies and needs to be very sturdy or it will come out.

While your glue is setting on your foam and before you start adding in your supplies, add your ribbon, bow and any decorations you want on your bucket.

Now it’s time to personalize. I used my cricut and vinyl but if you don’t have that available, Hobby Lobby and Michaels have really cute stickers that could be used instead.
 Now take your popsicle sticks. I found these colored ones at the dollar tree. Using your scissors, cut the bottom so there is a point.
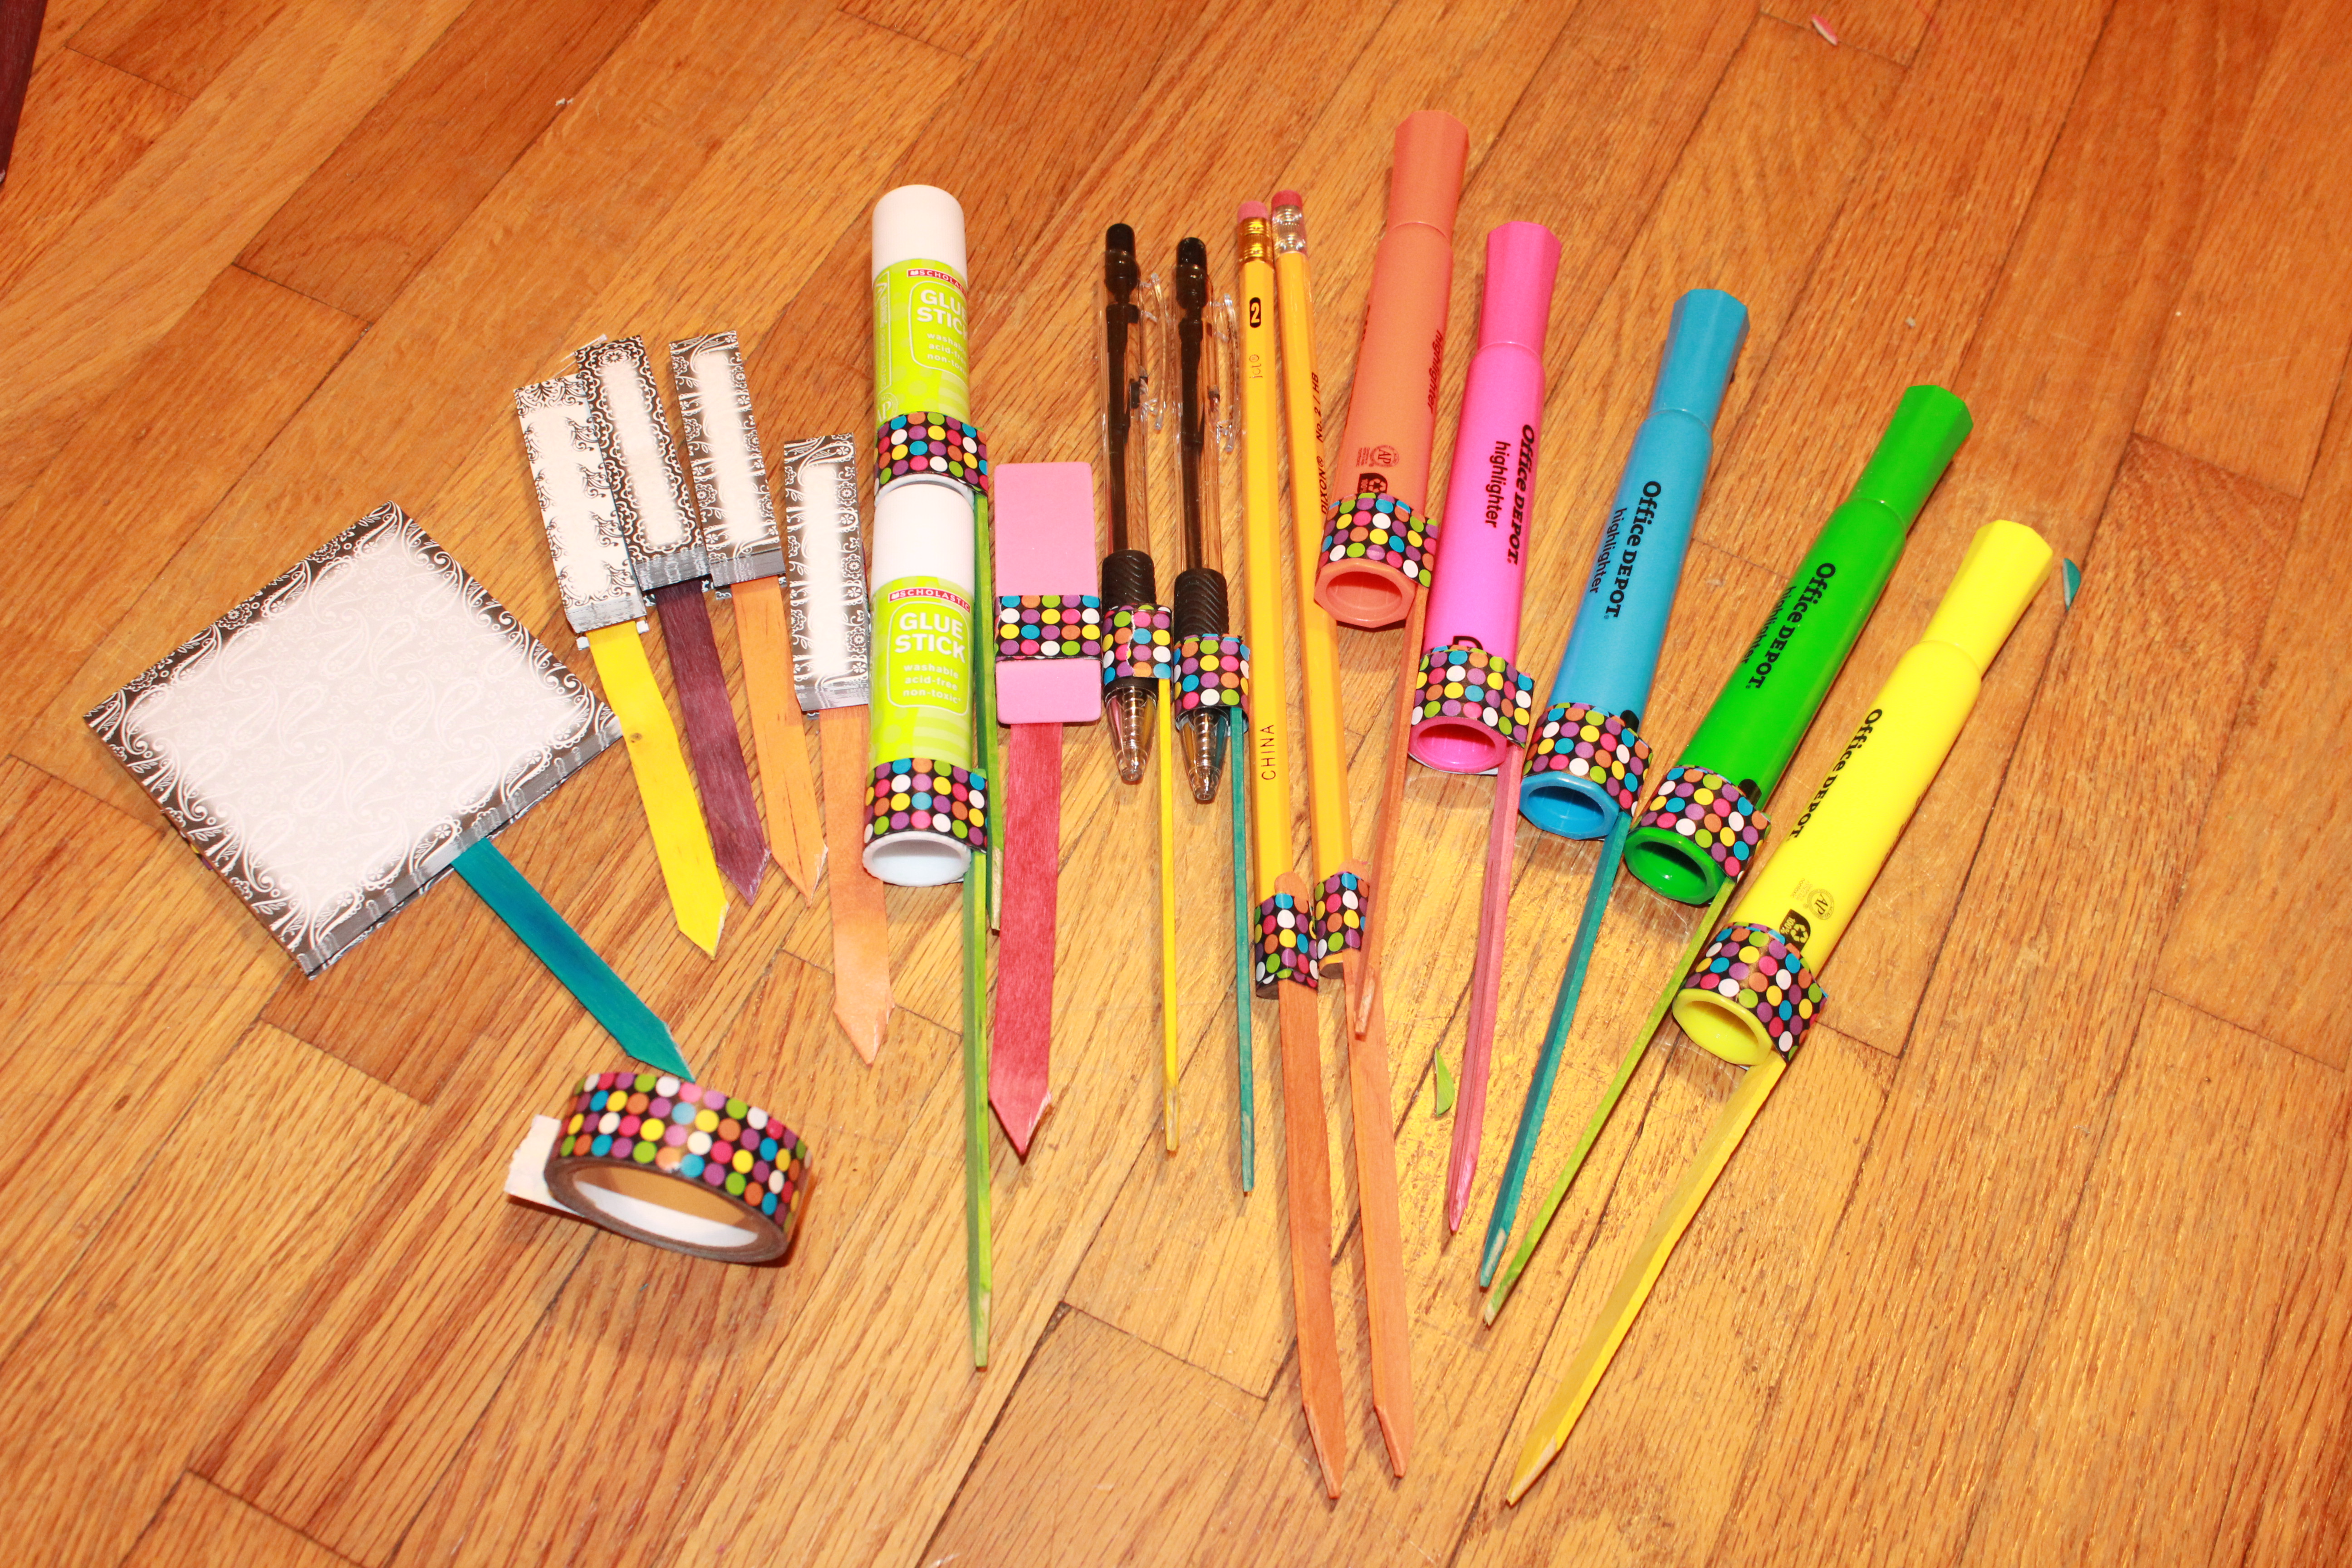 Using the tape, tape the popsicle sticks on each piece with the pointed end down. You could also use BBQ Skewers here instead.
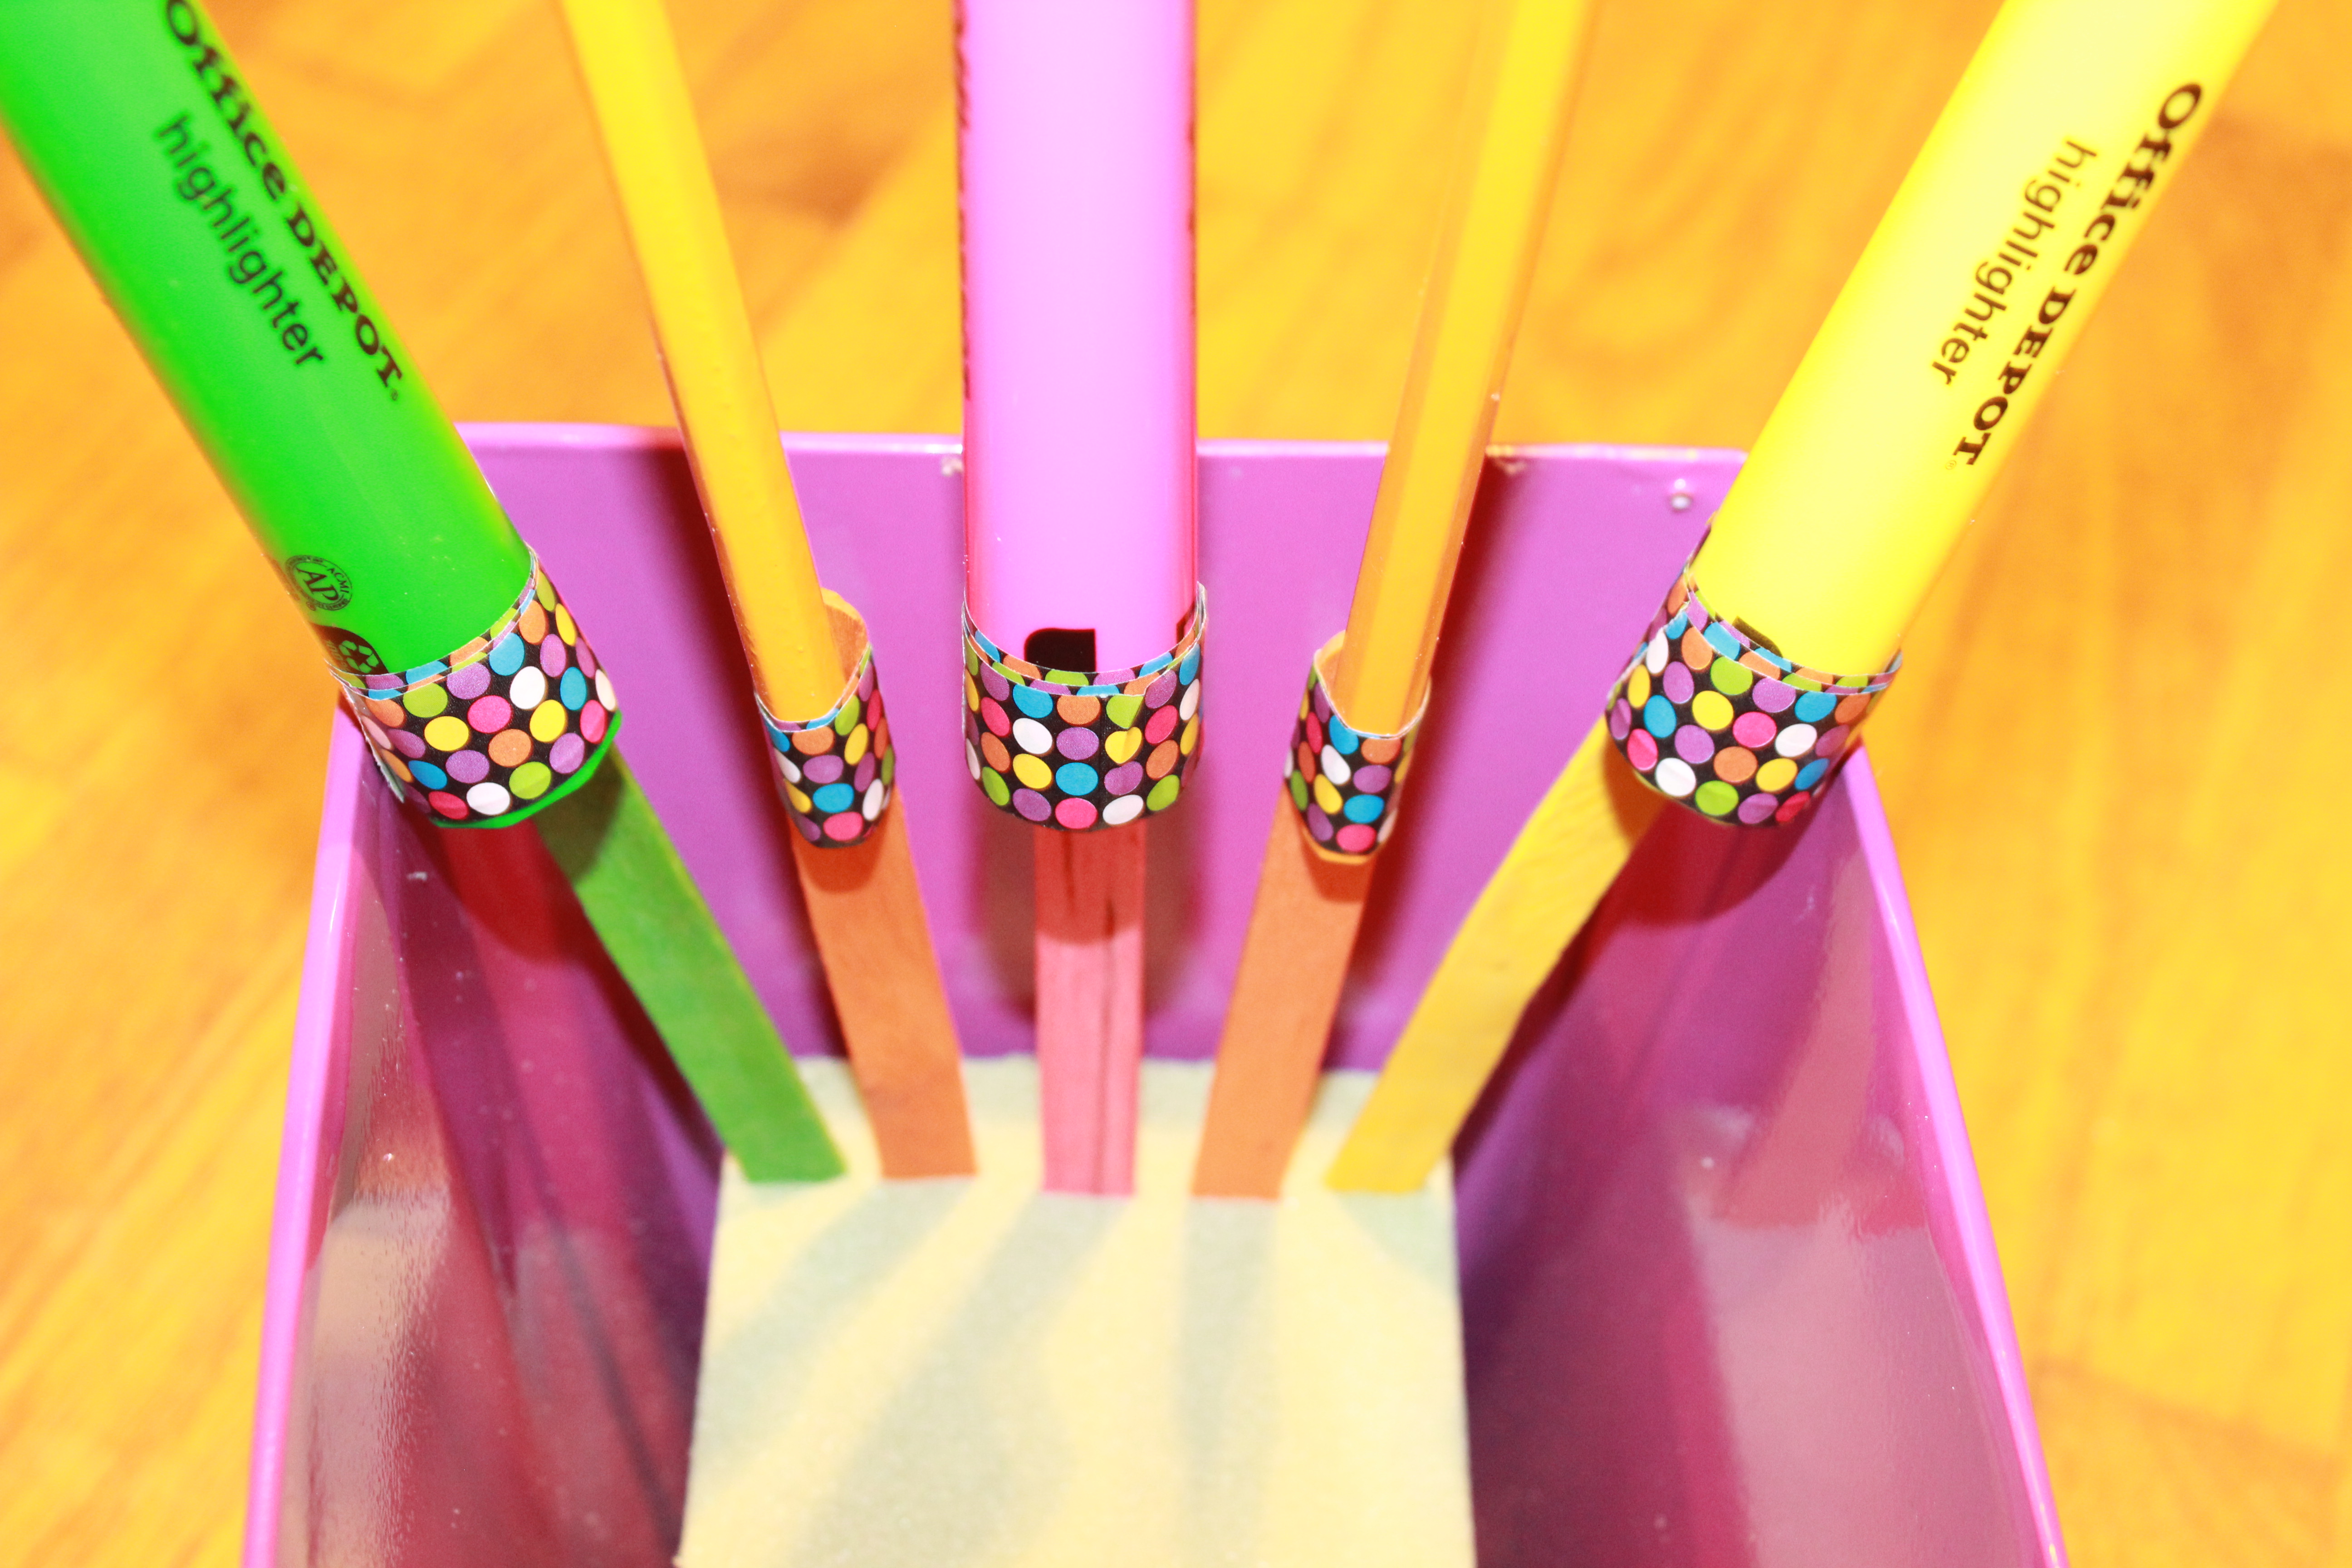
Now for the fun part! Adding all the school supplies. Just push them in far enough they won’t go anywhere.
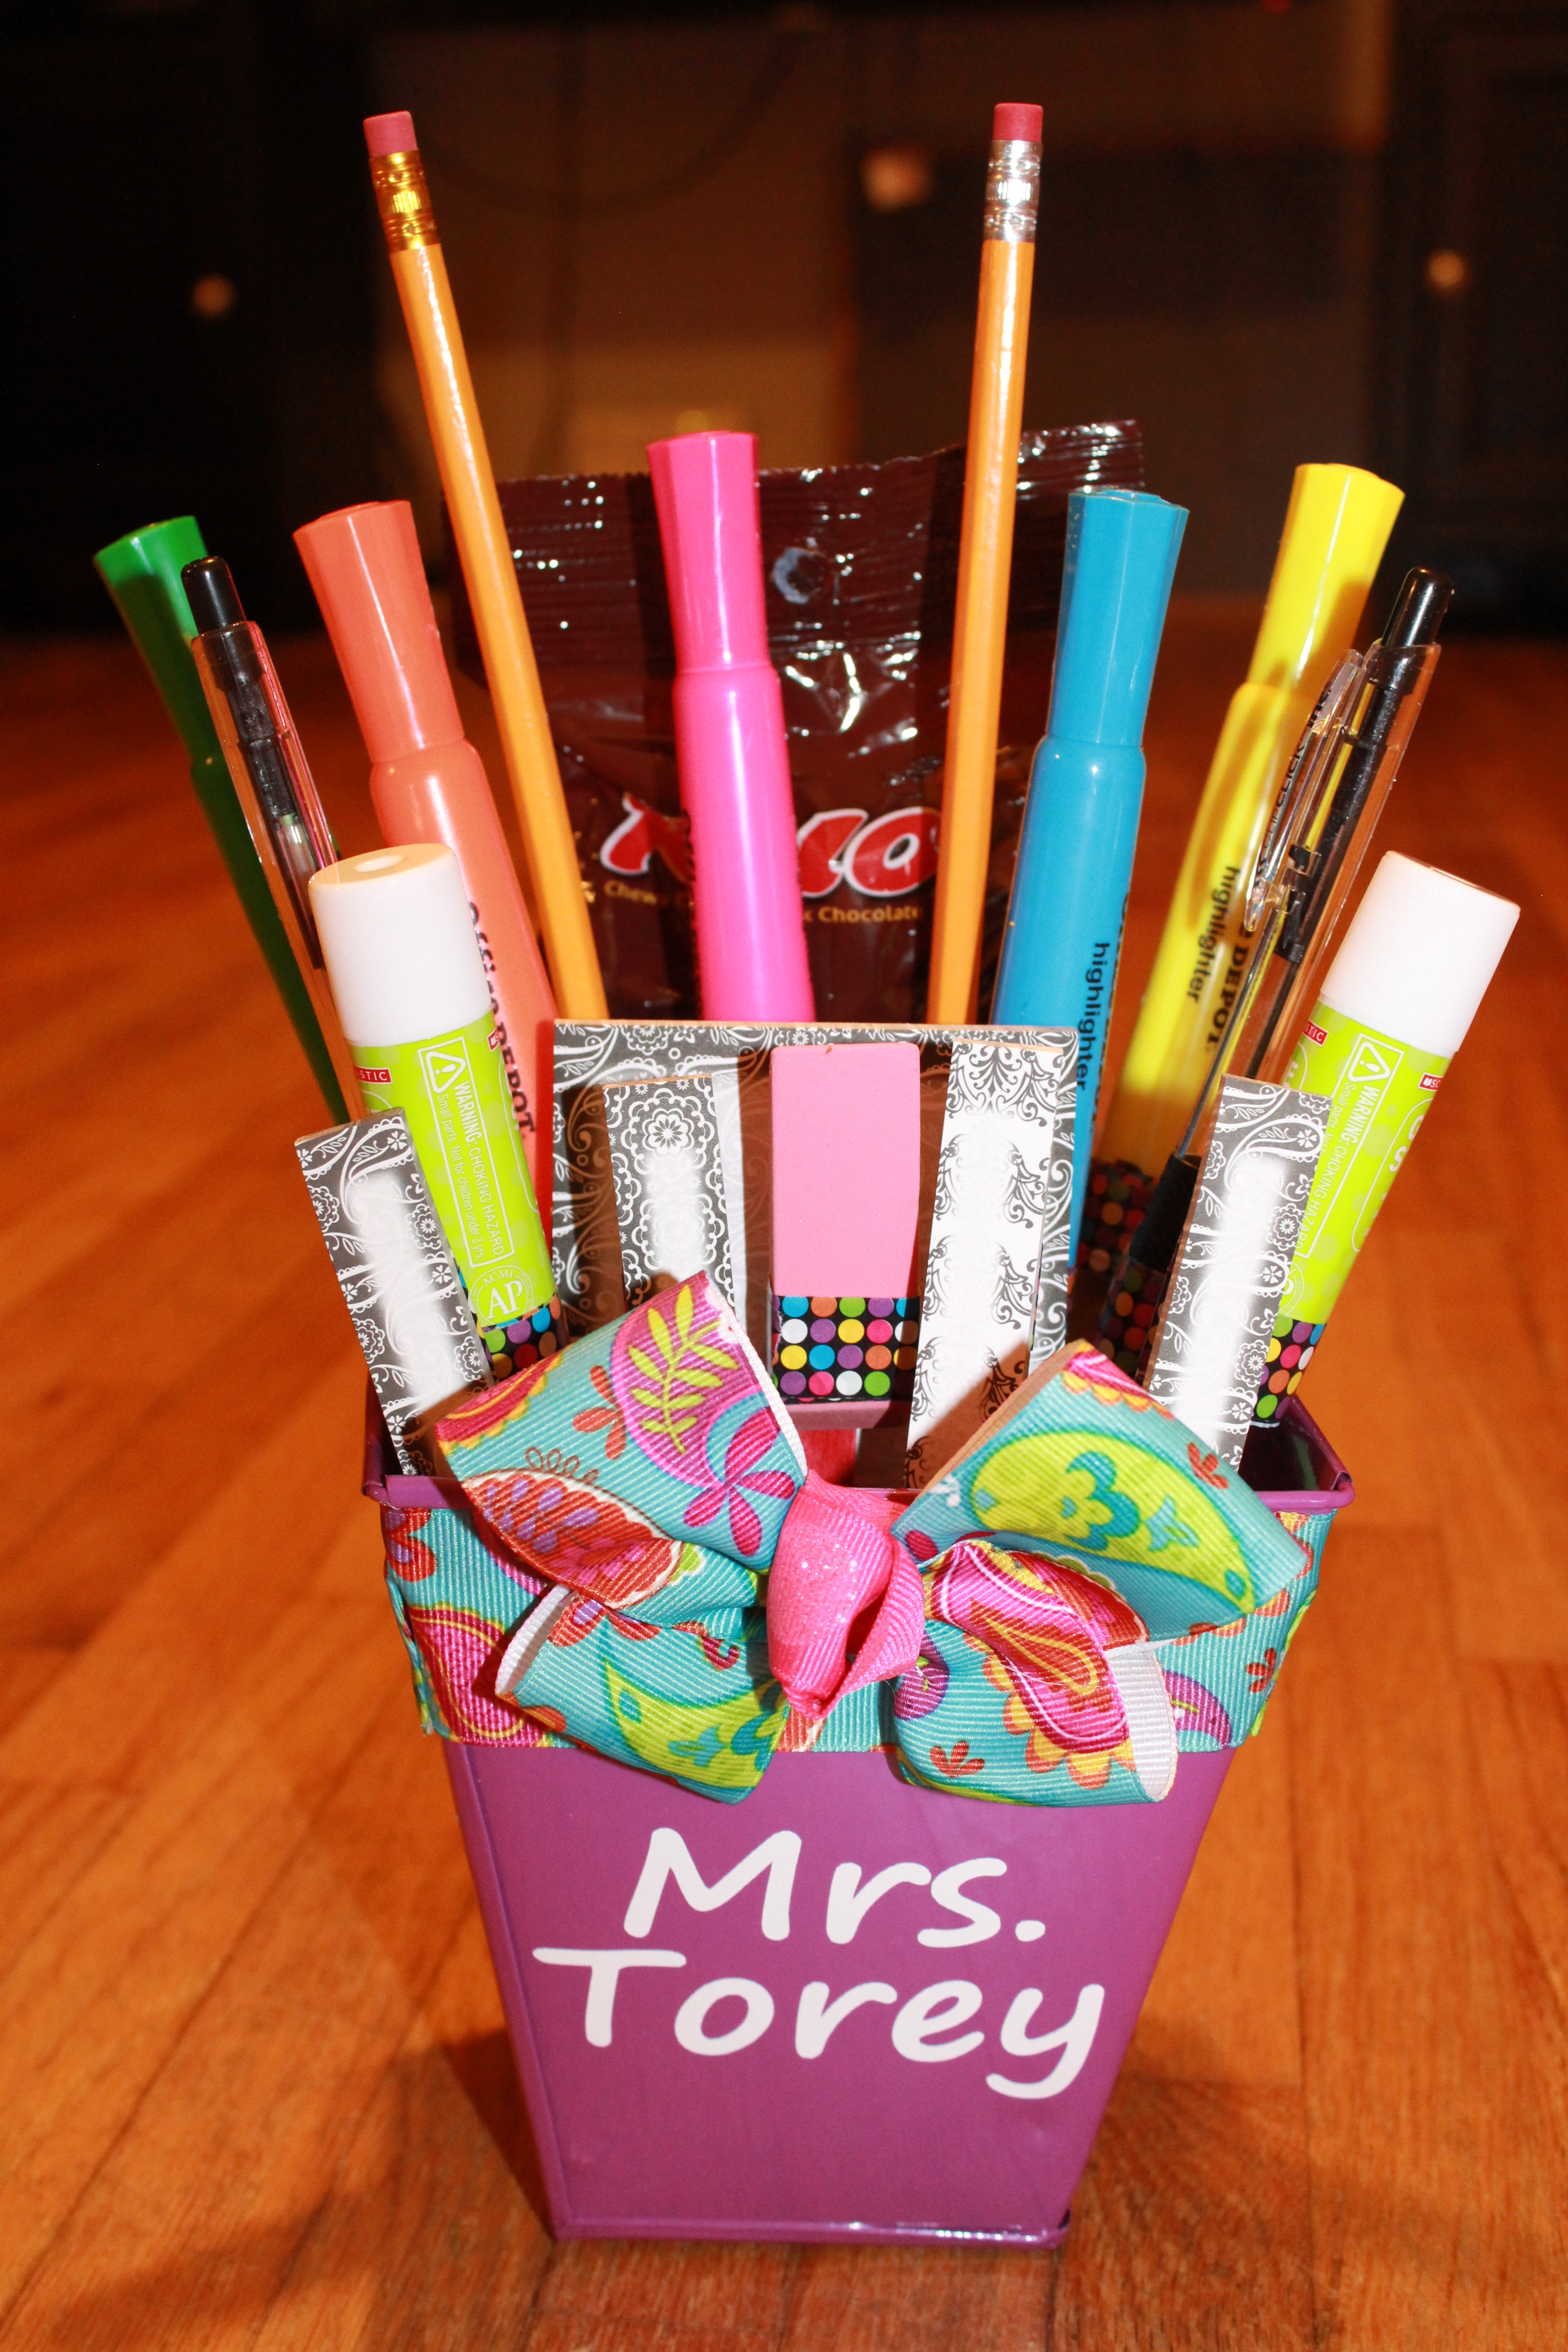
 The girl’s teachers loved them! And they were super proud to give them a gift on the first day of school too. This gift only cost me around $5 thanks to the amazing deals we have here for back to school sales! Would love to see your finished project if you make one!
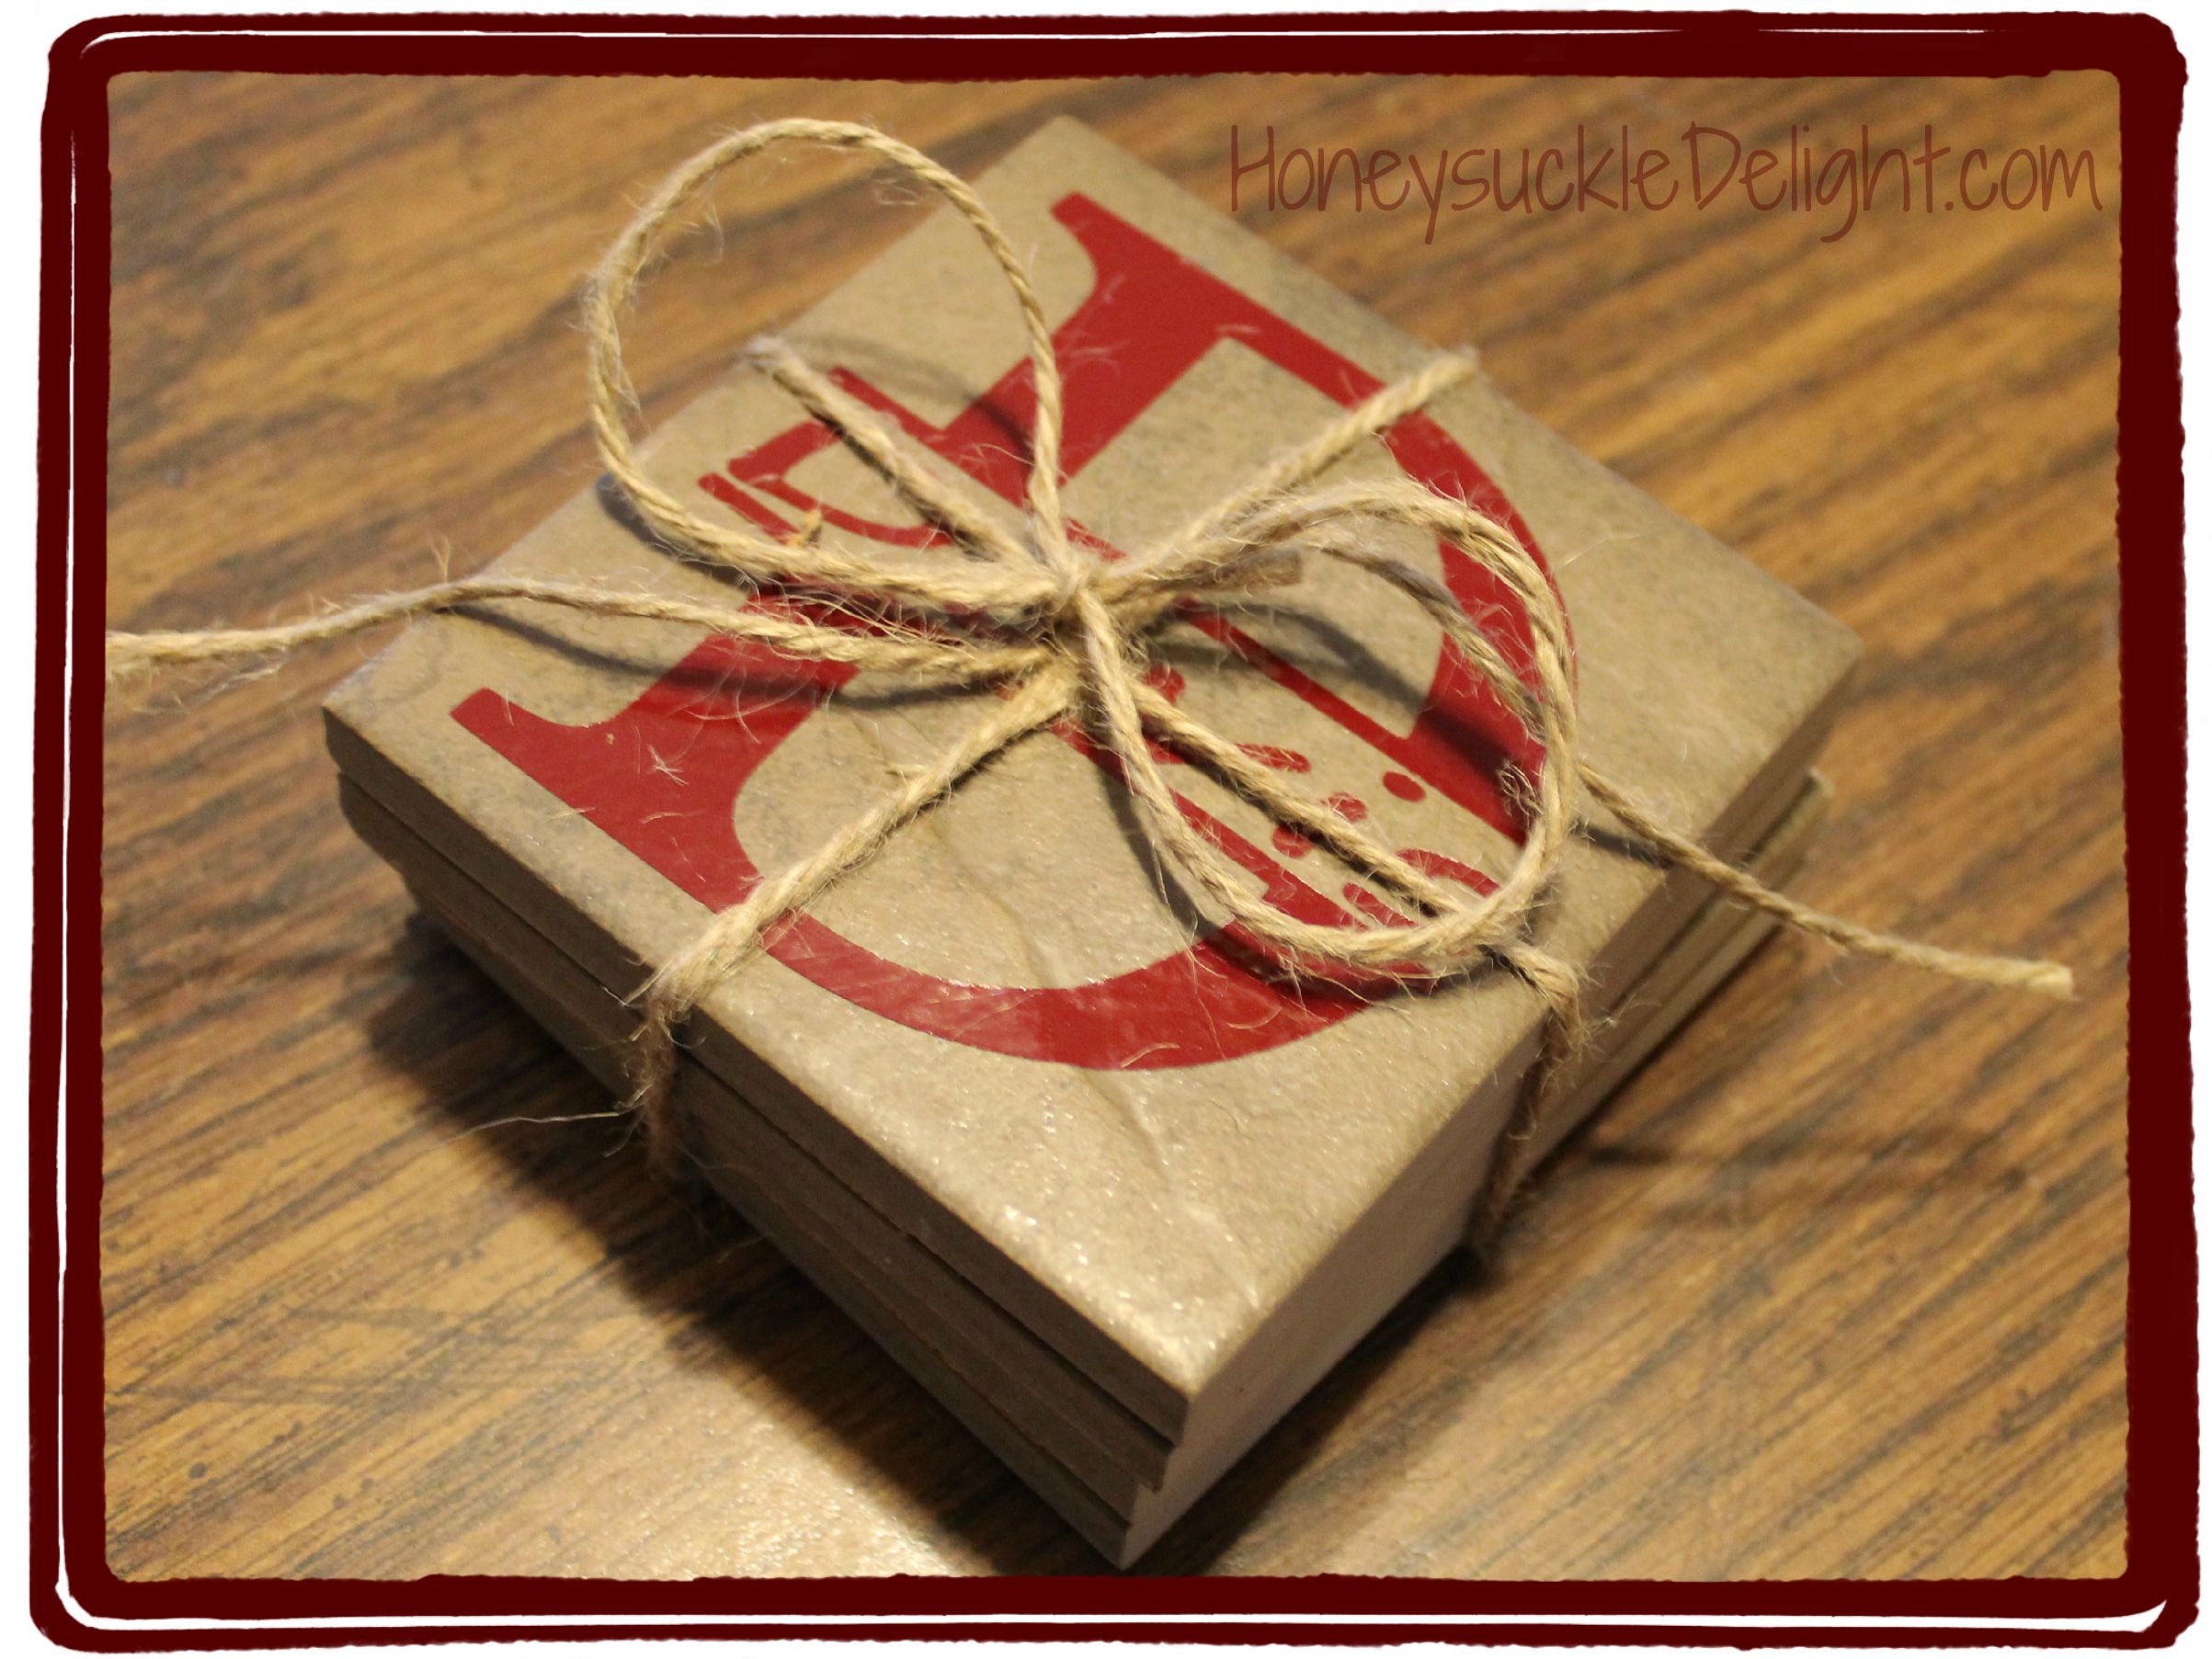
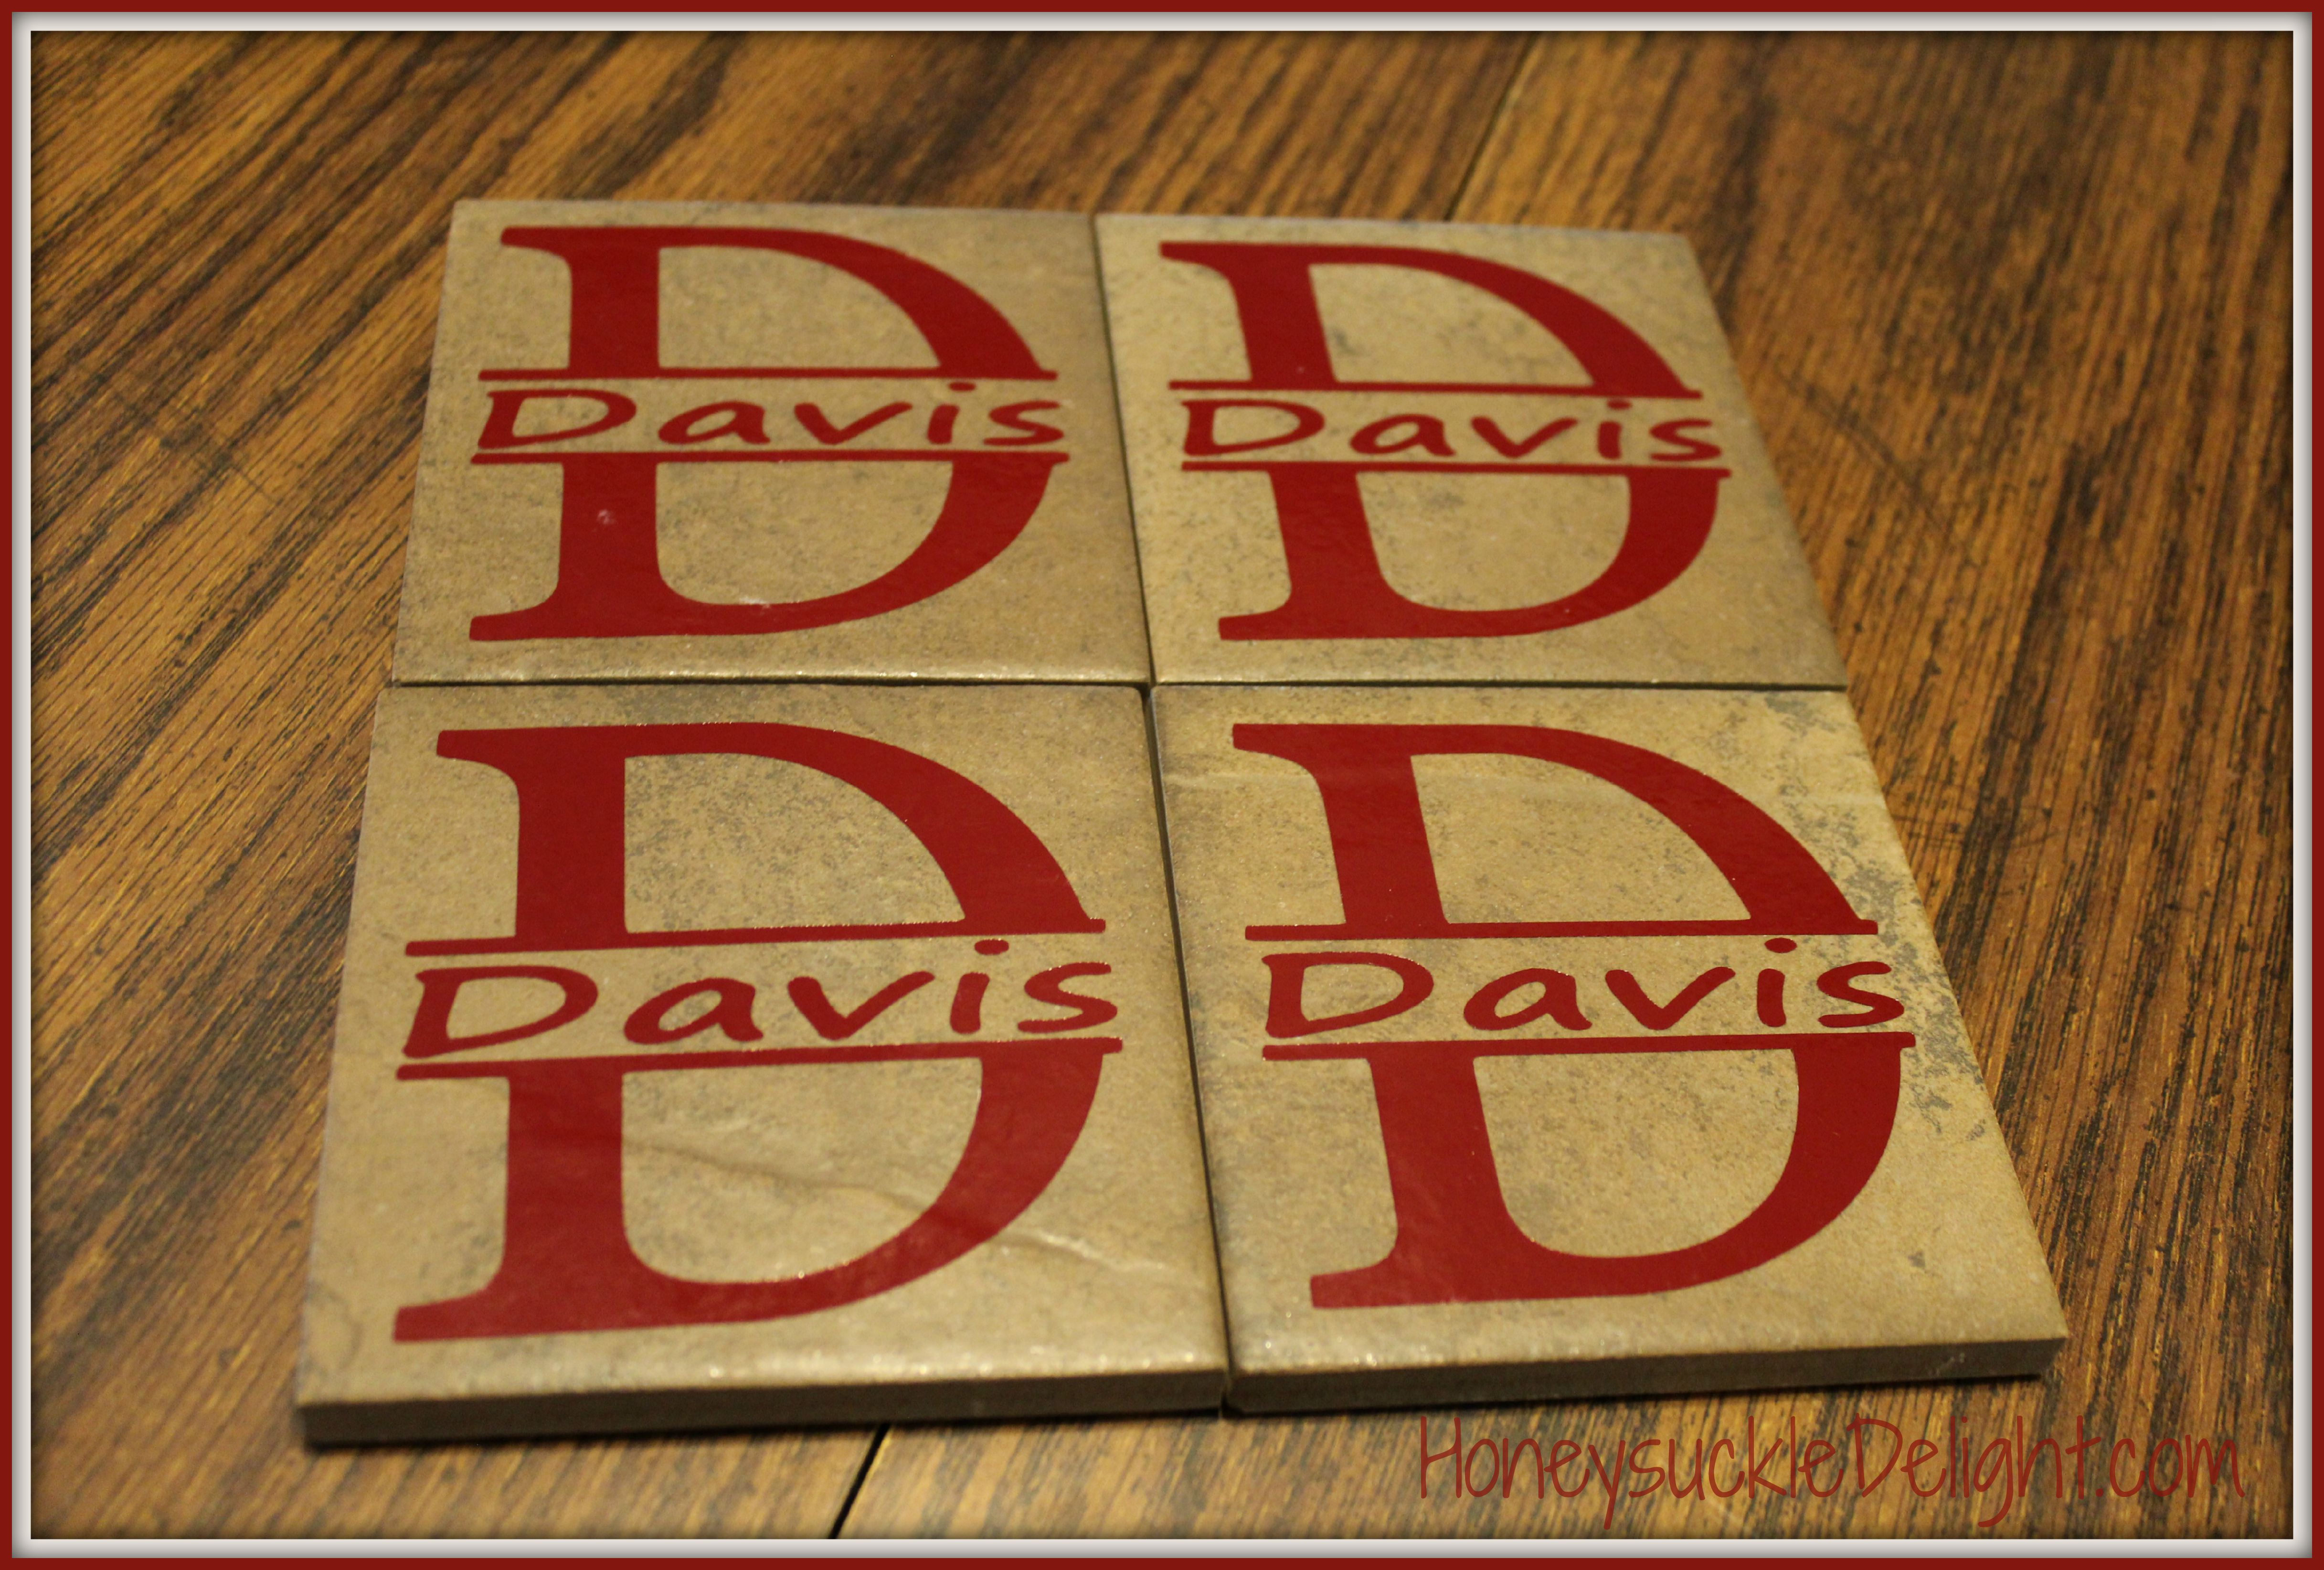
Wedding Gift Personalized Coasters
Every time I need a wedding gift, this is one of the things I make first. Monogramming everything is the craze these days, but just think about how even more exciting it is to have your new last name on everything right when you get married! This super easy craft is also good for any gift not just weddings. I have a friend that has me make them for her every Christmas for her kid’s teachers. I even made them for myself and still love them!
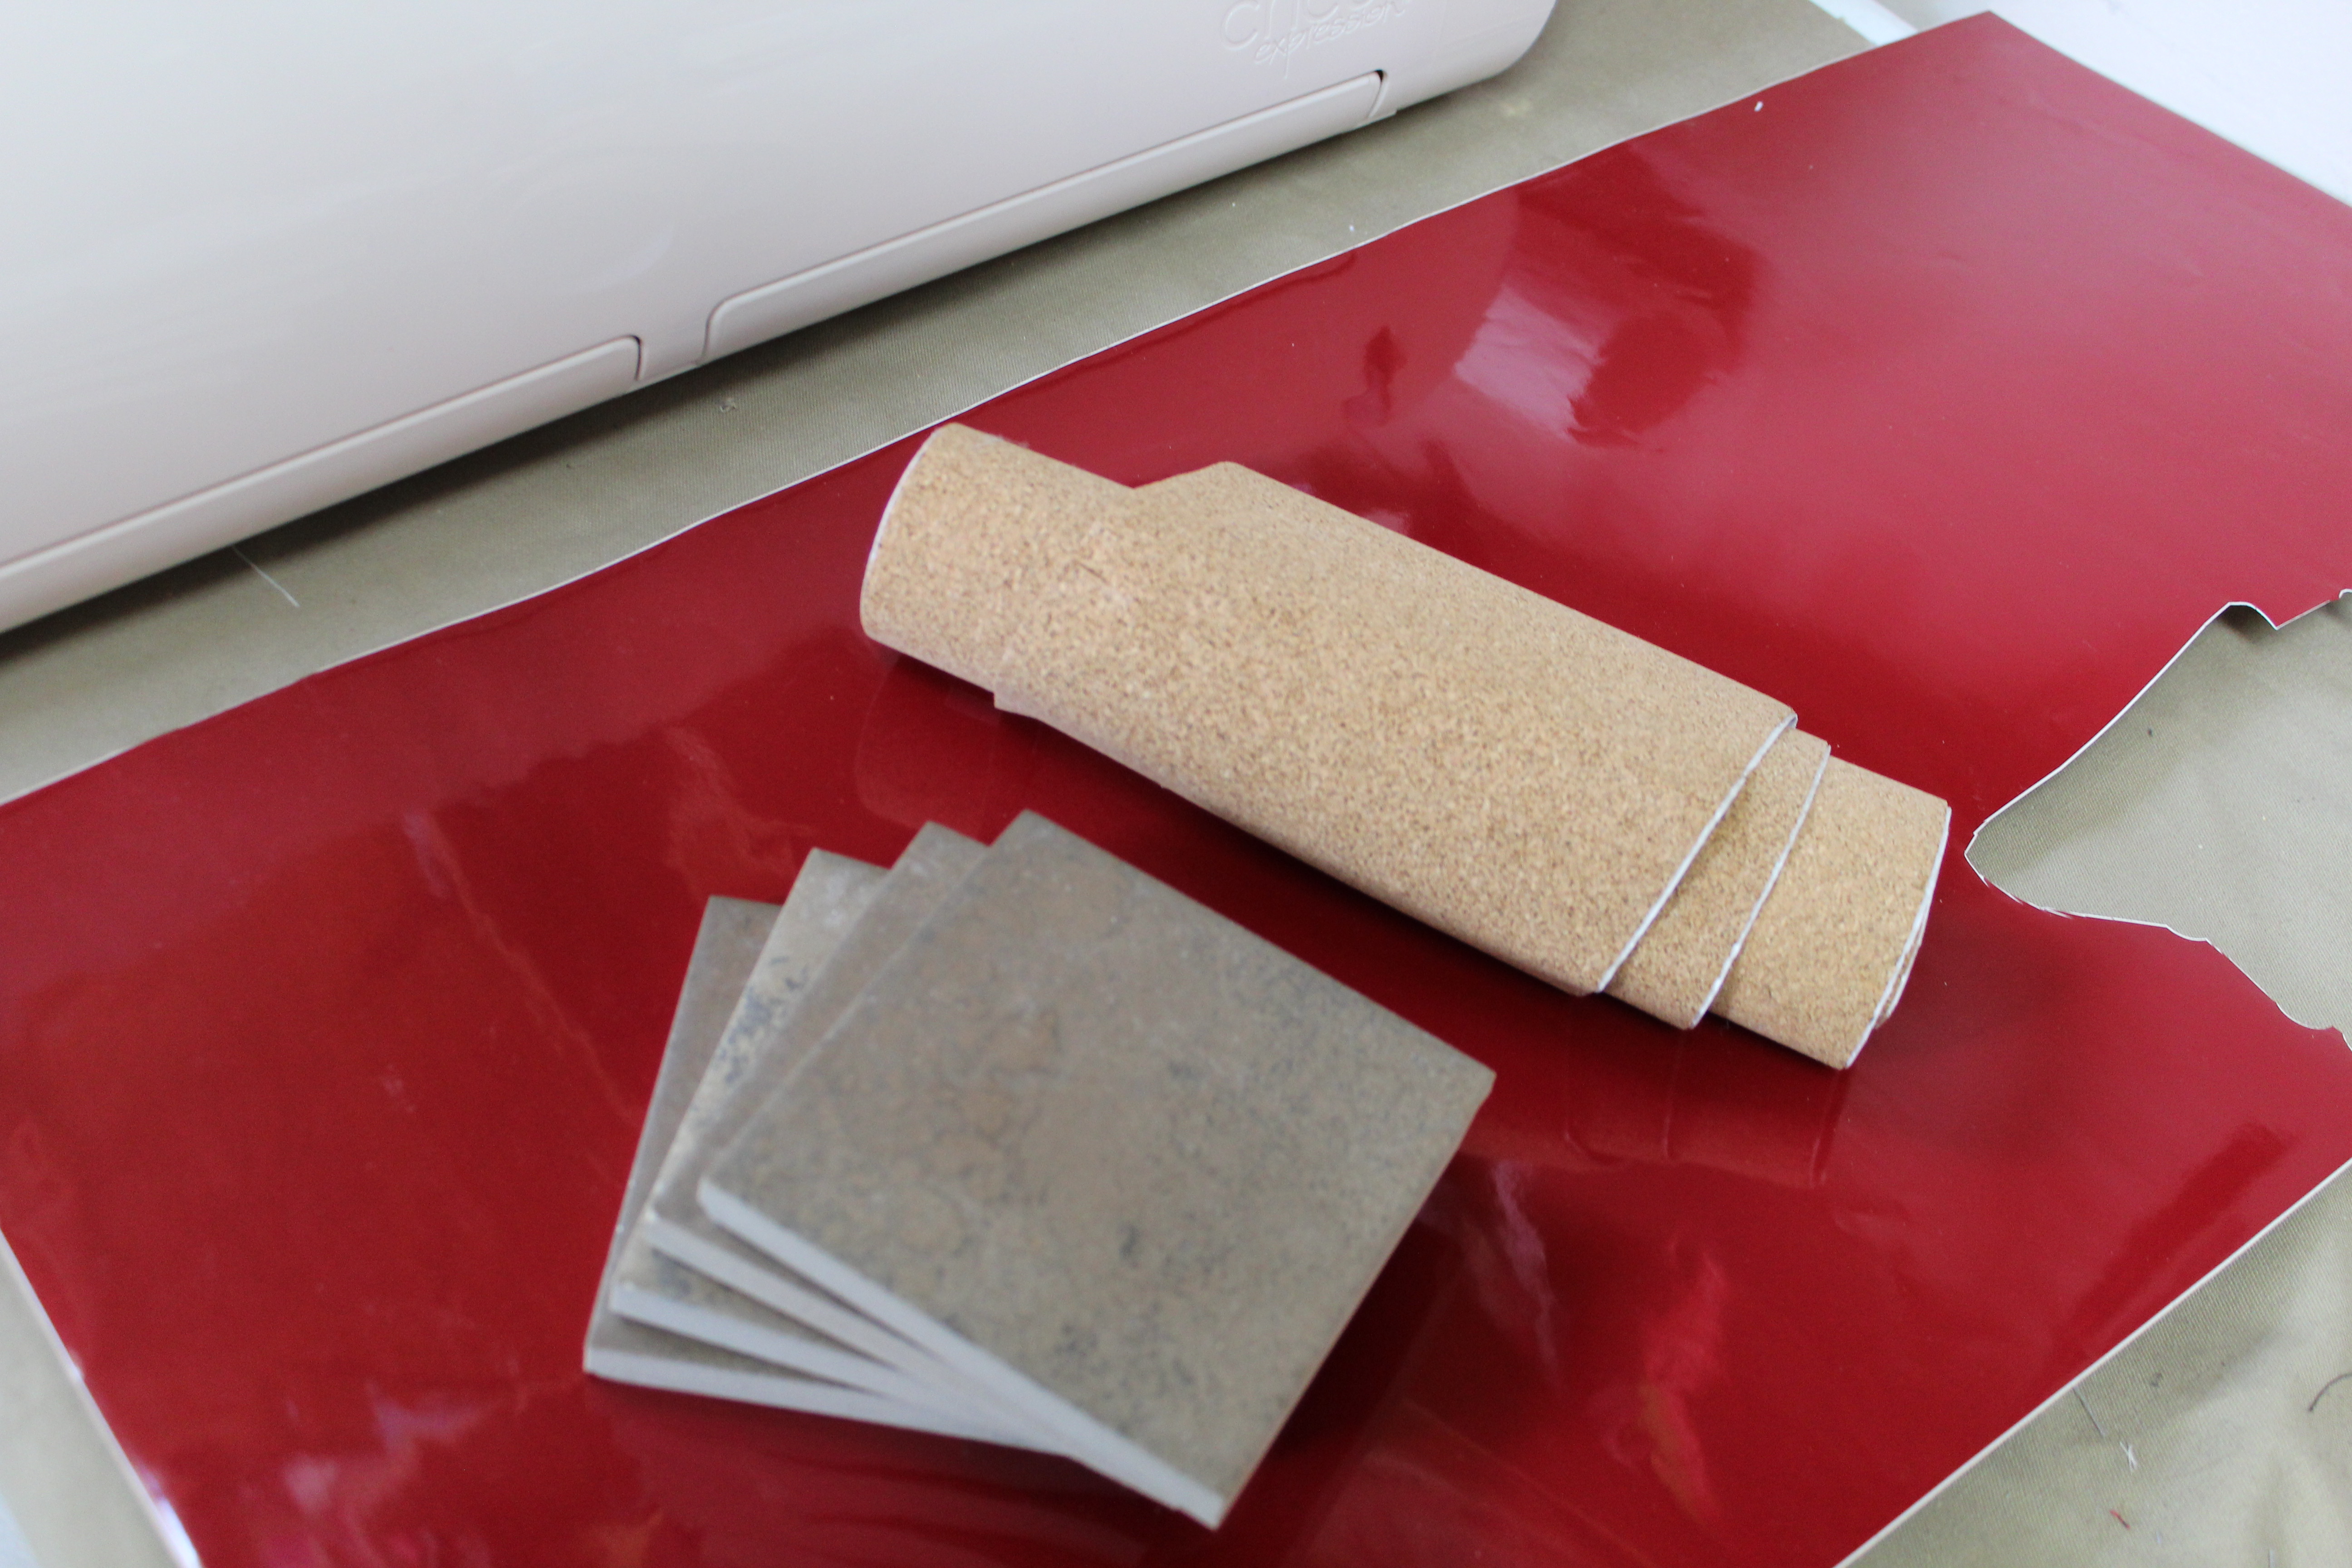
Supplies Needed:
4 Coasters (these came from Home Depot)
Cork
Vinyl
Contact Paper
Twine or Ribbon
Start by cutting out your vinyl. I used my cricut. The letters measured 2 1/2″ x 2 1/2″. Weed your vinyl by carefully pulling away all the excess vinyl. Be very careful as you get to each new letter and especially pay close attention to the dot in the I! It is super easy to lose….don’t ask how I know that! Lol
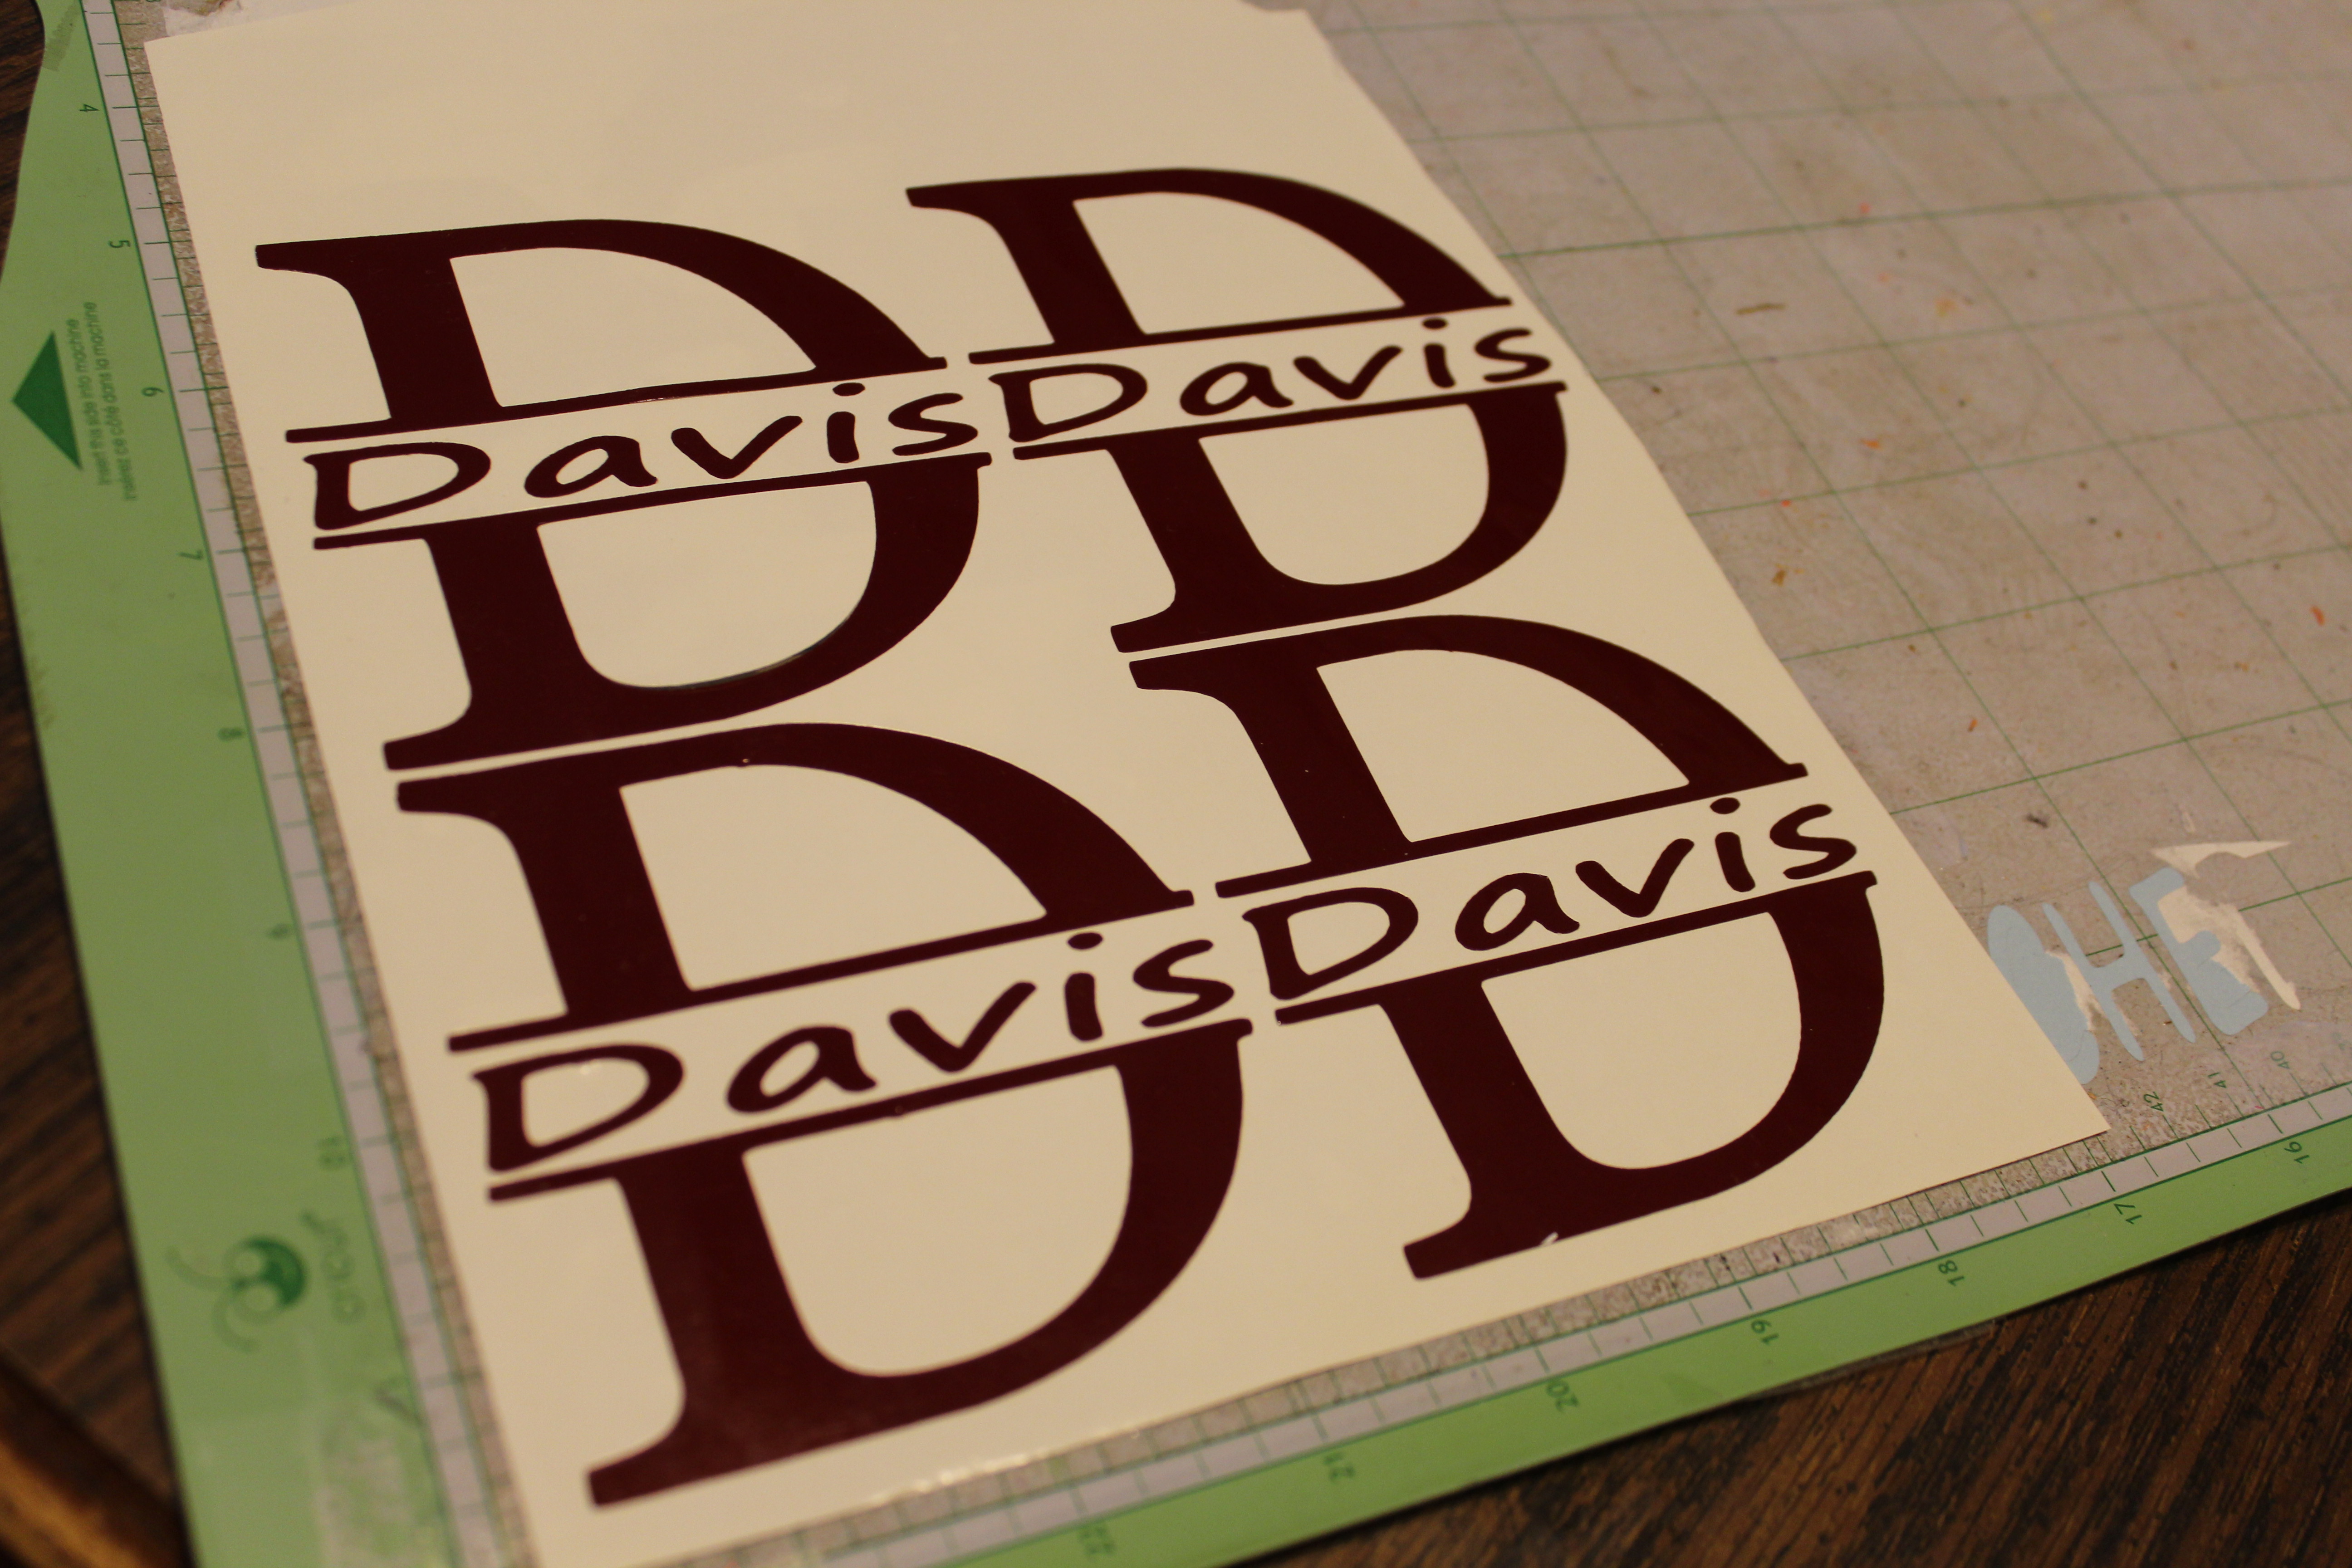
Now carefully peel off each name using the contact paper. Then transfer it to the top of the coaster. These letters were almost as big as the coaster so it was fairly easy to get them straight.

Once you are done with the vinyl you are ready to start putting the cork on the bottoms.
I got my roll of cork in the aisle with the contact paper at Home Depot. I know they also have this at Lowe’s and Walmart. But in my experience it is always really close to the same price. Start by measuring and cutting the cork the same size as the tile.
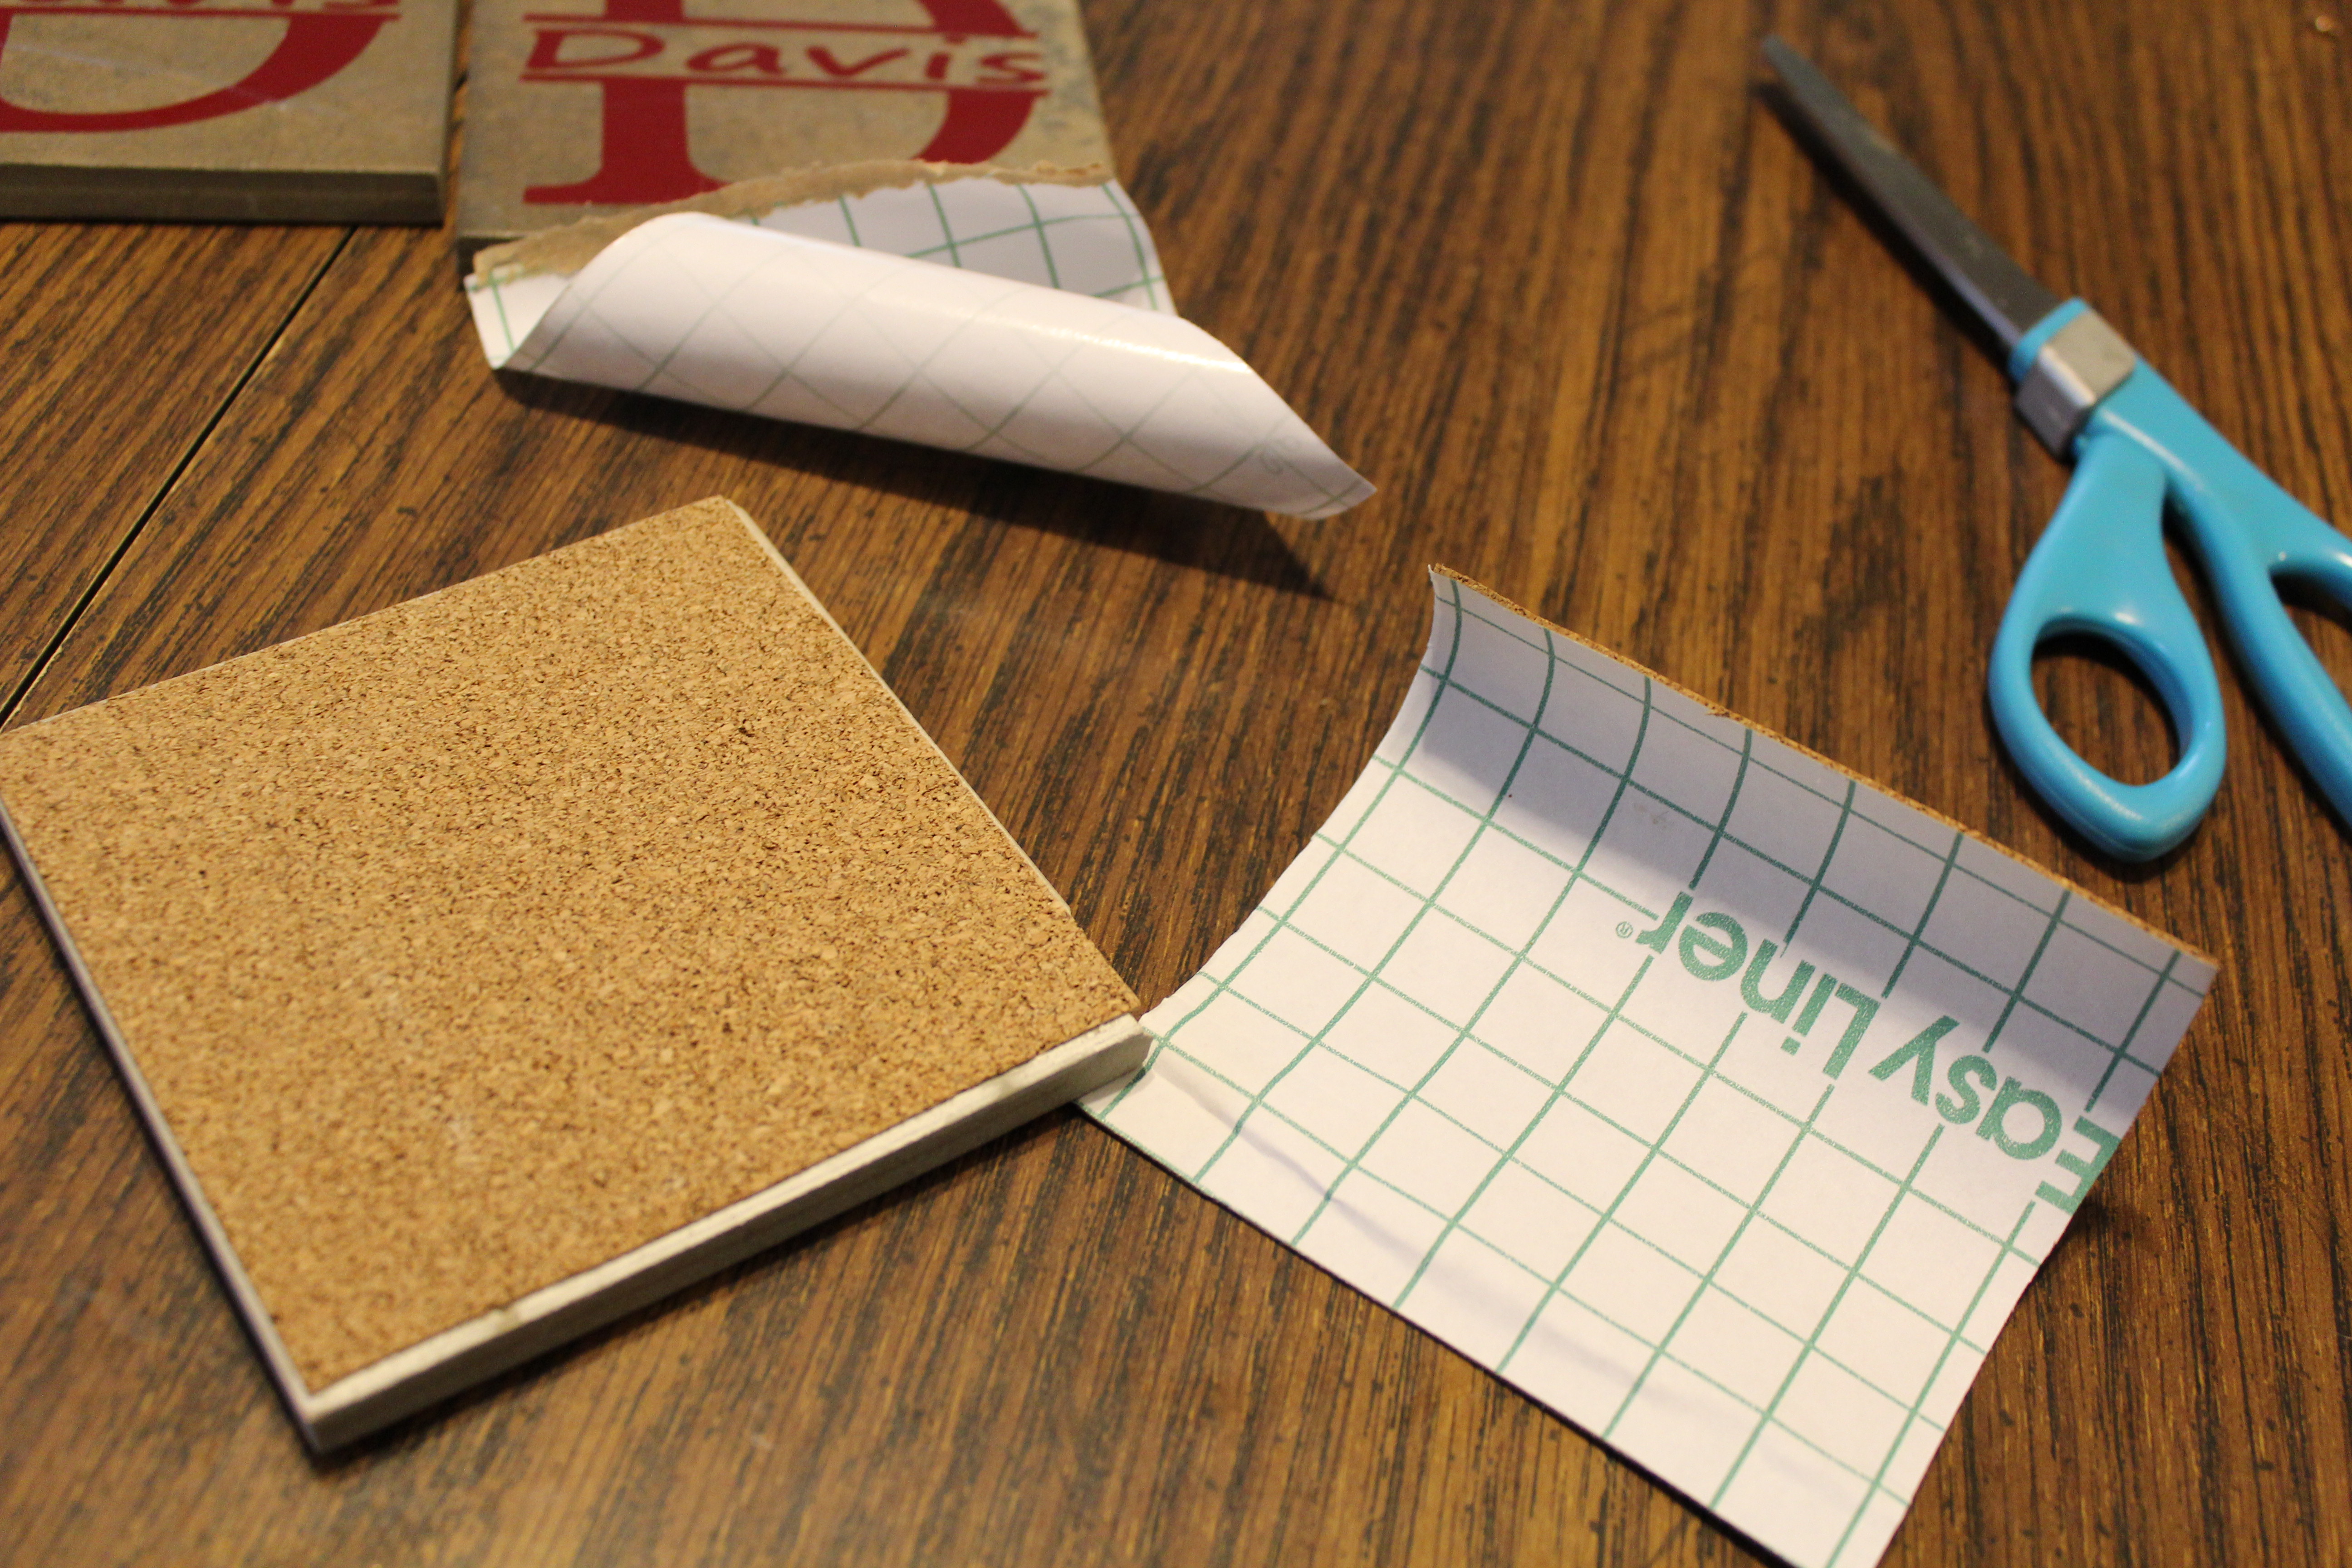
Then fold back one corner of the cork and line up the rest with the bottom of the tile. Push the corner down that you folded the backing on and carefully peel the rest of the backing off pressing as you go. Sometimes if I didn’t cut straight I will go back and cut off the excess so it’s not showing from the top.
Now stack them all up and tie them together with twine or ribbon. This wedding was a country theme so I thought the twine fit well. If I am making it for Christmas gifts, I like to tie it with Christmas ribbon.
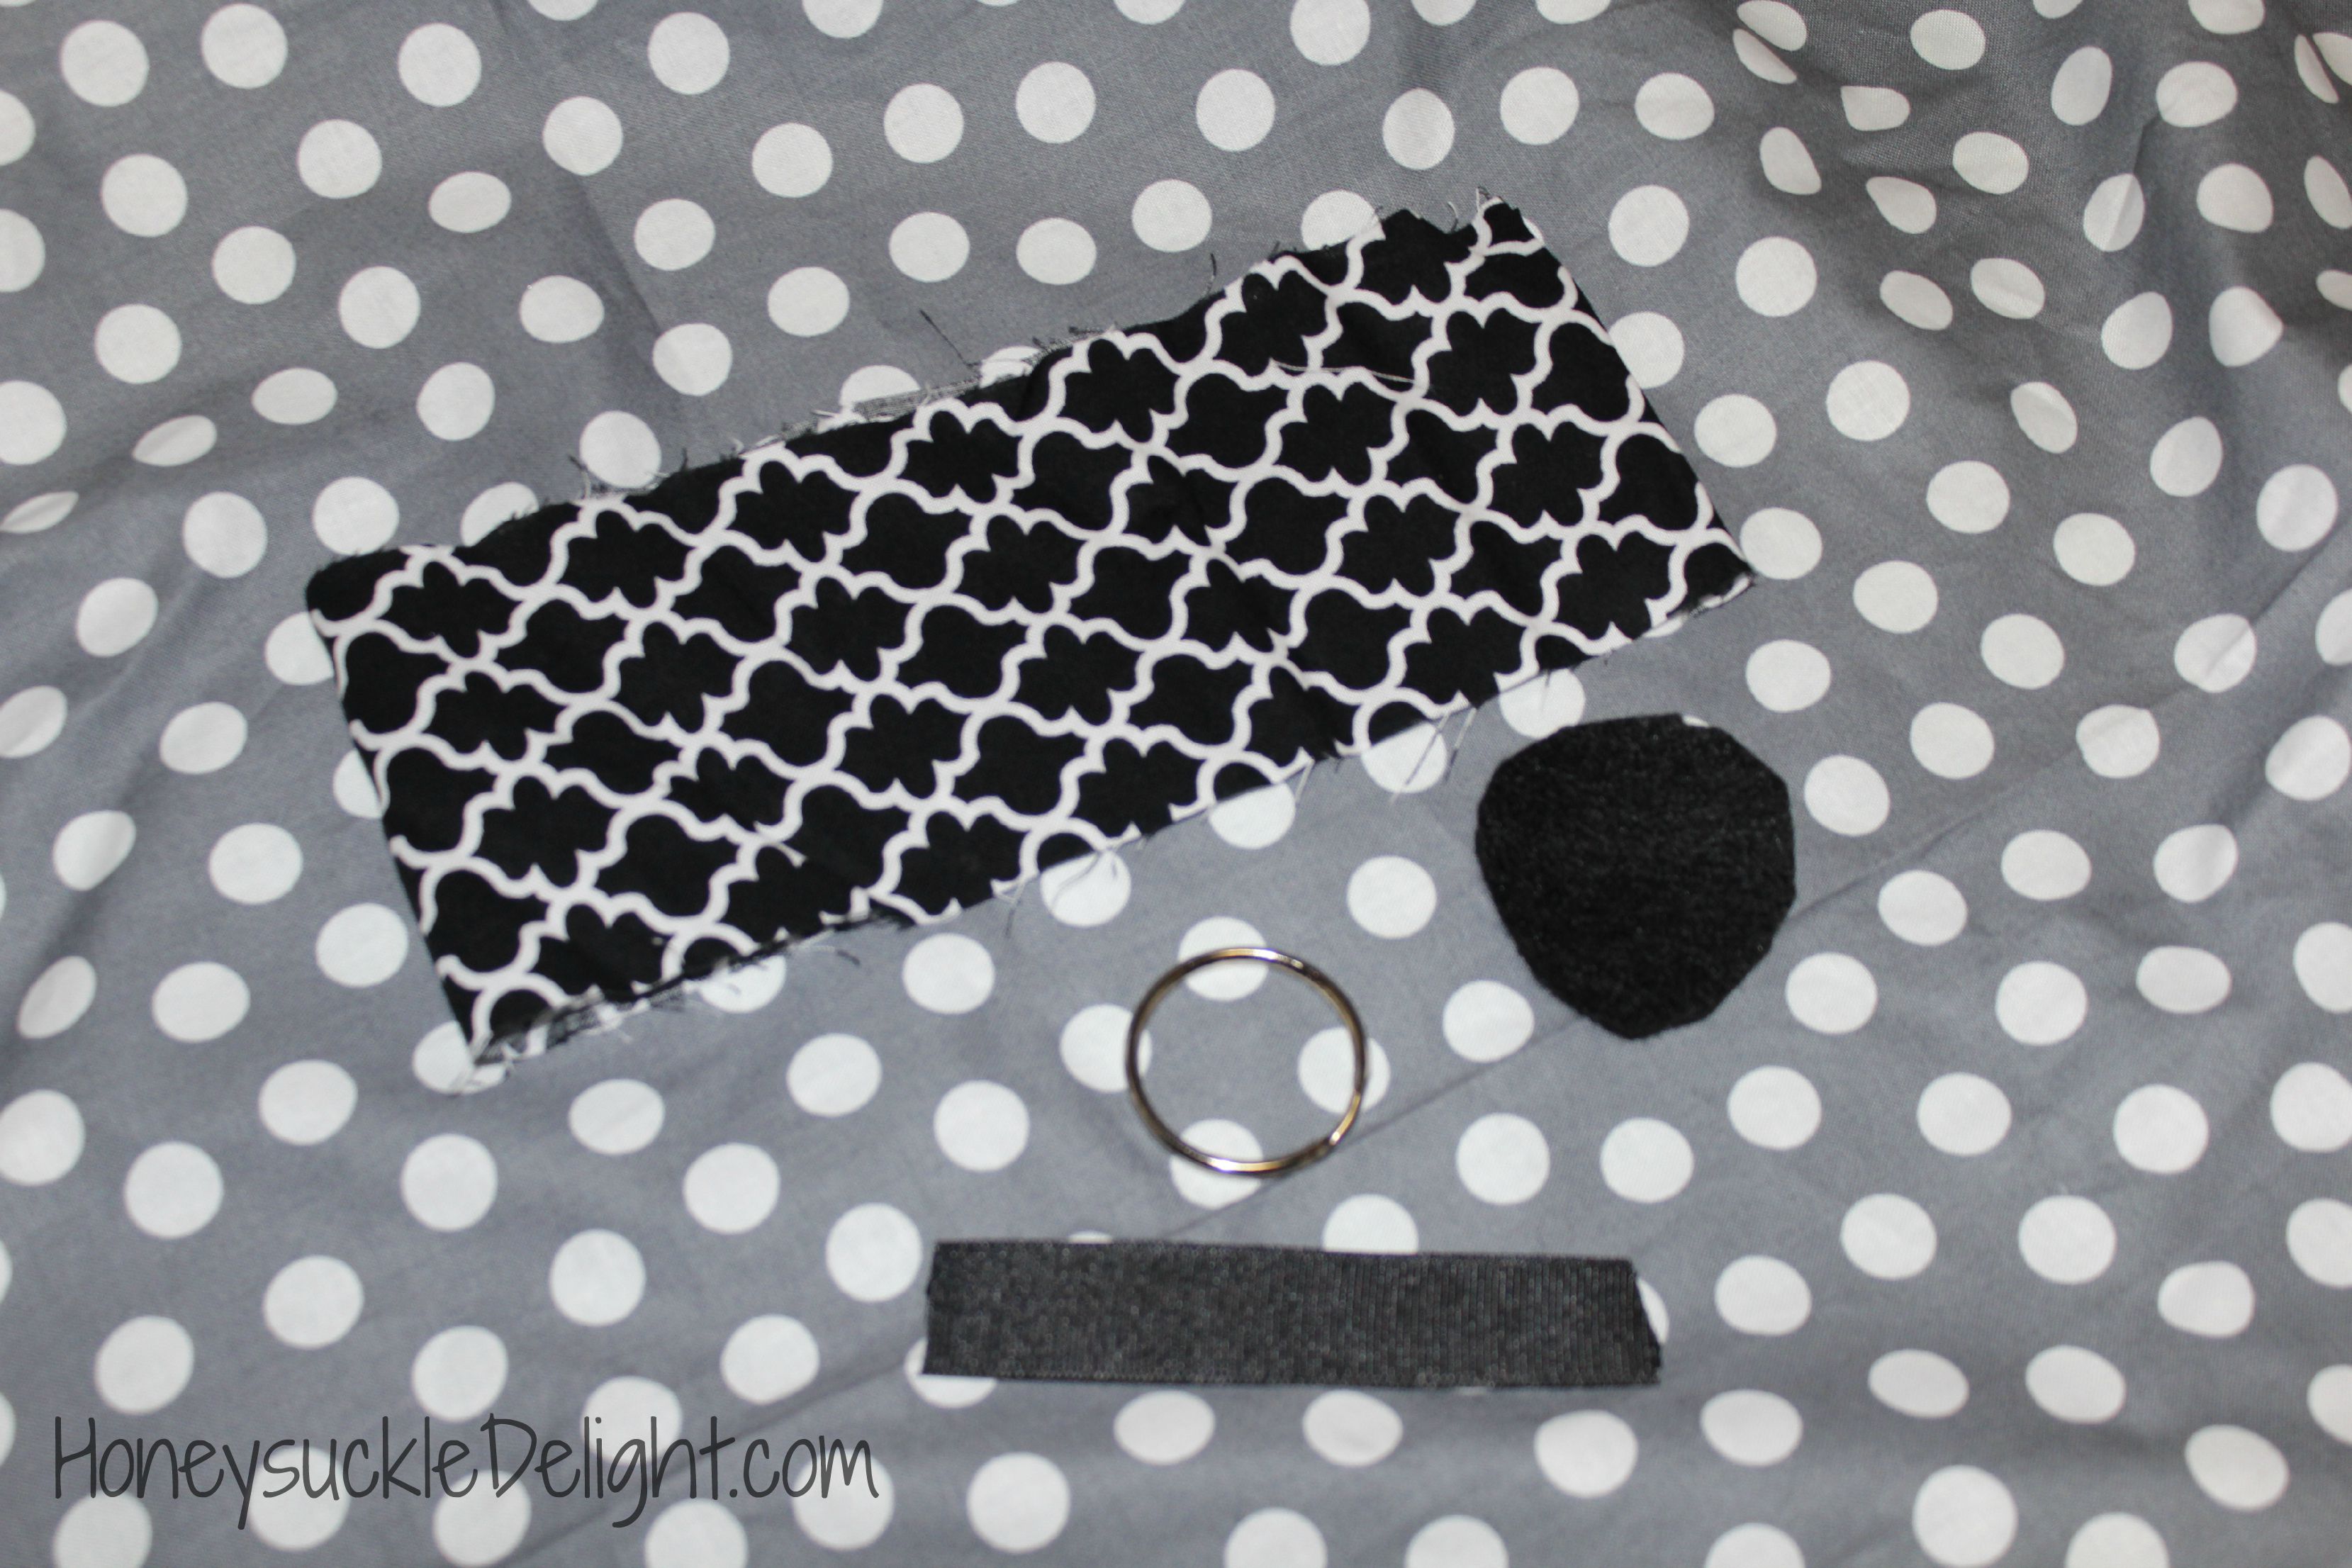
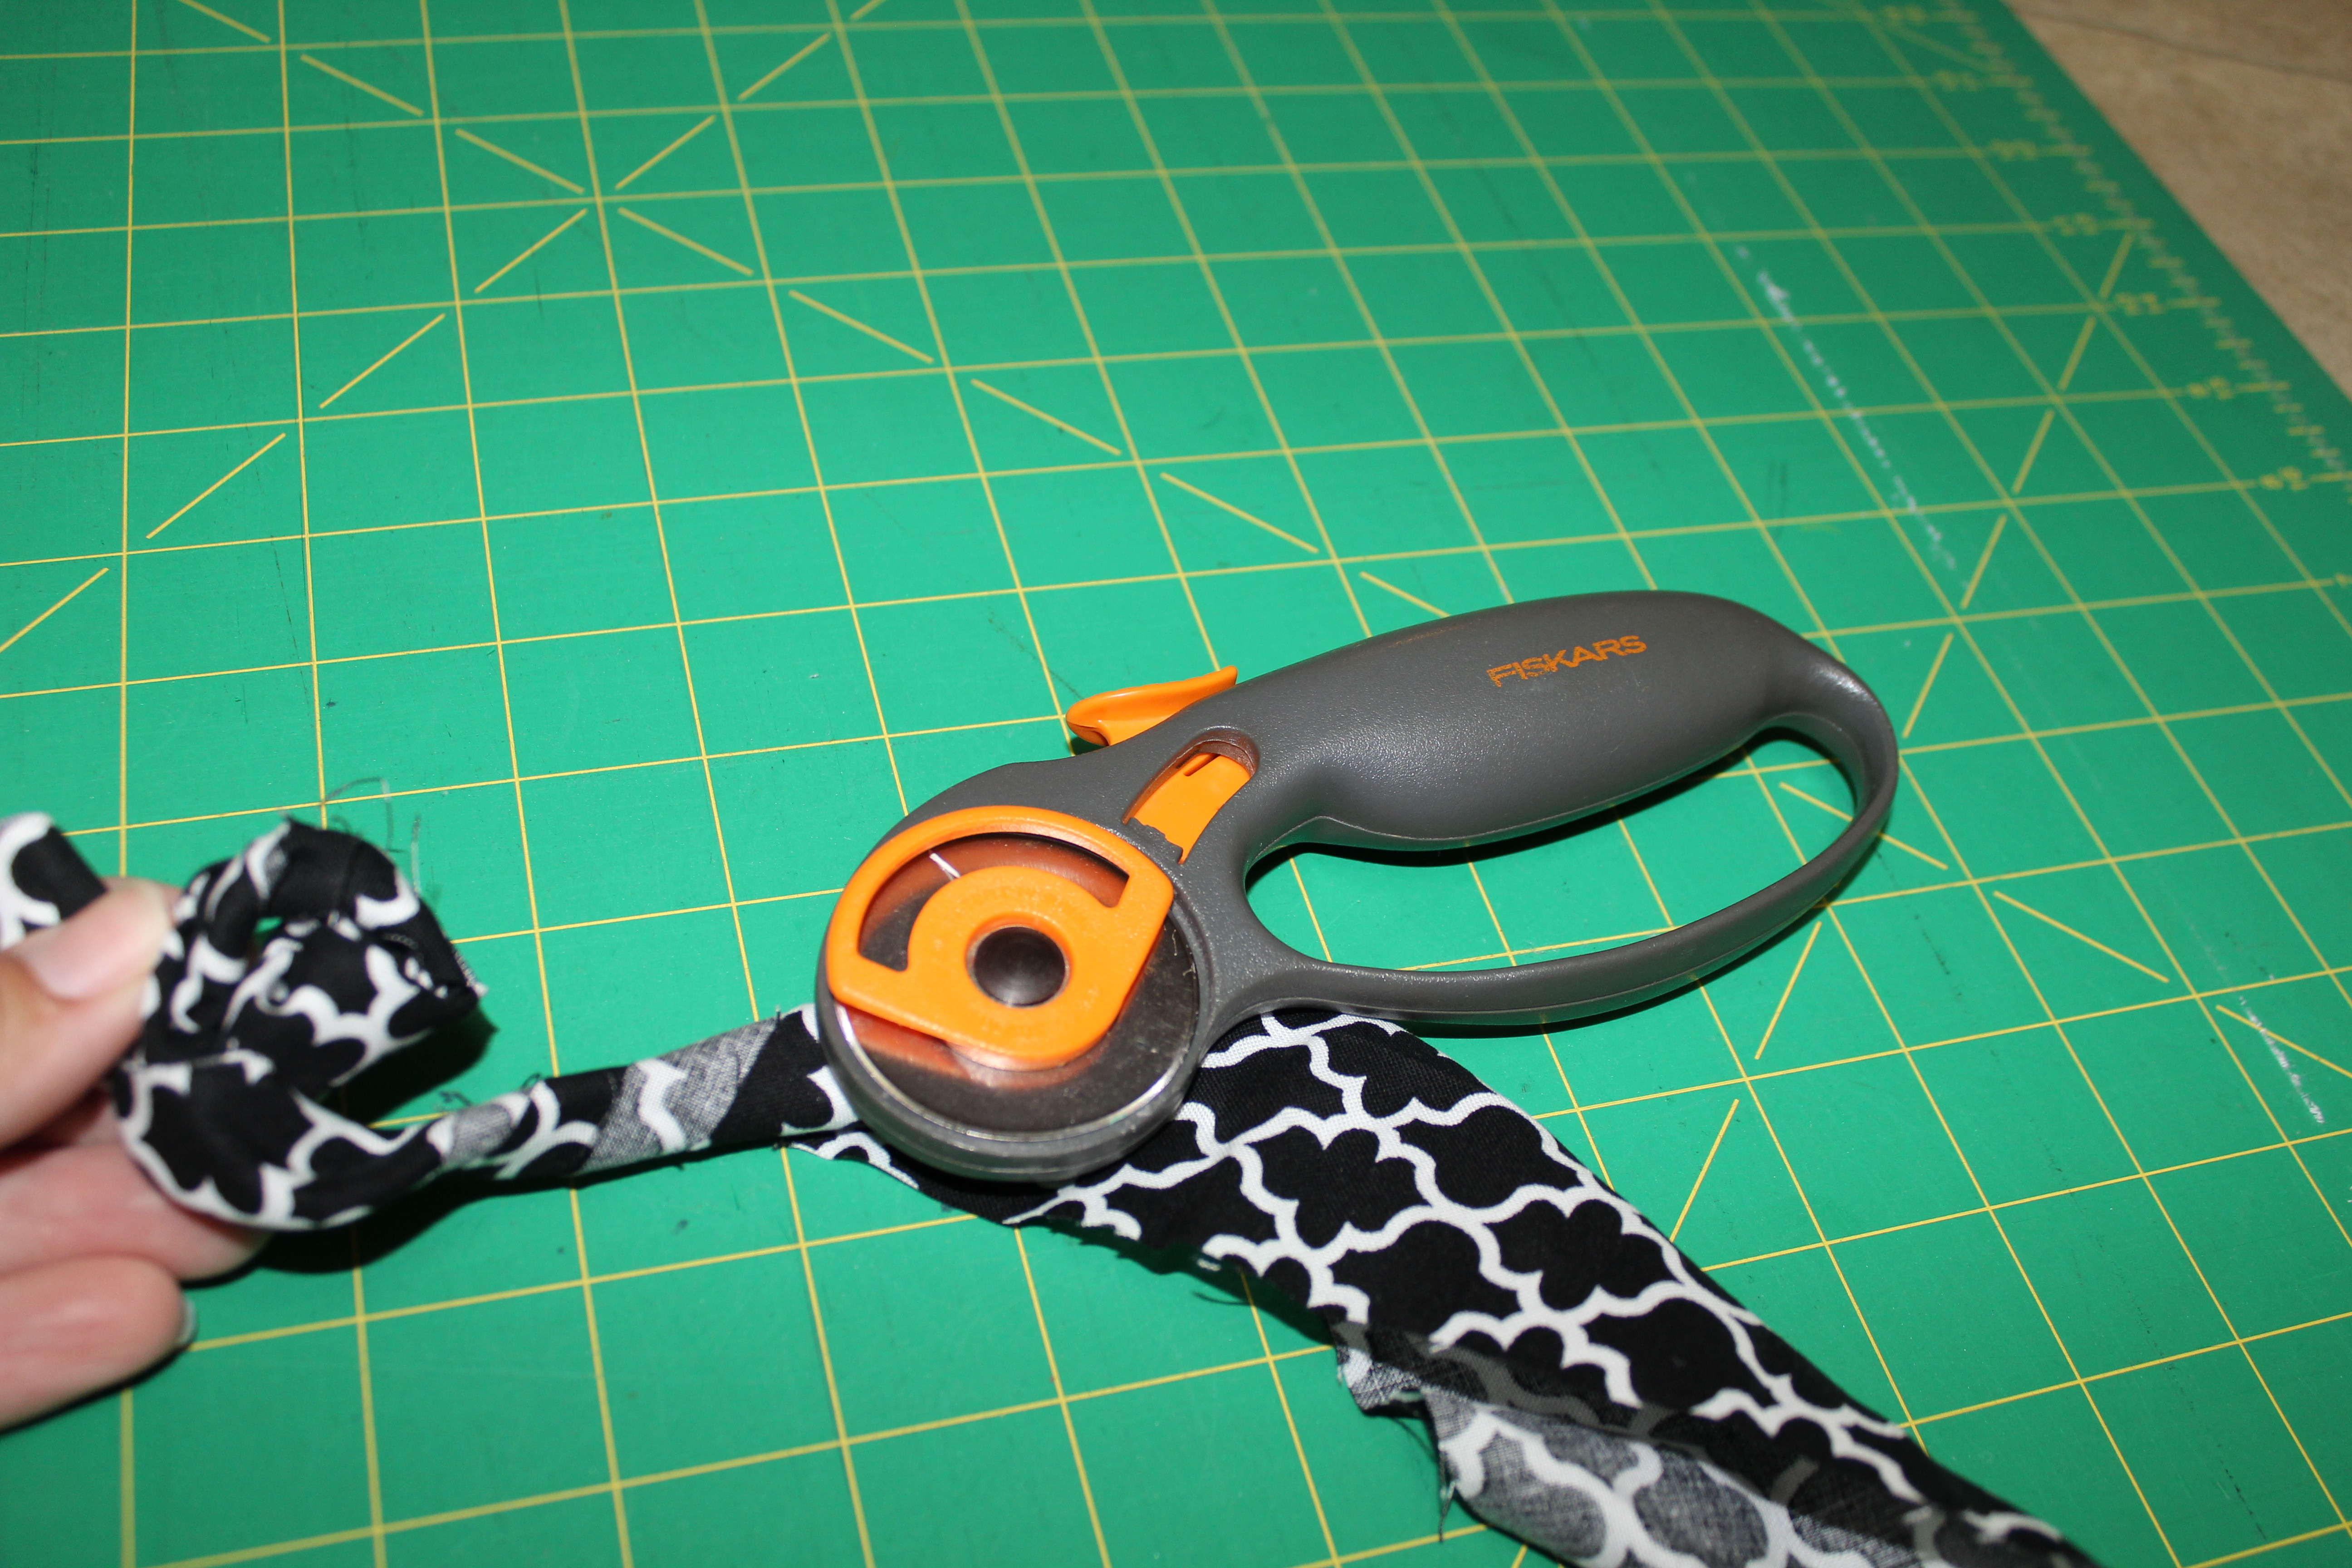
Fabric Flower Keychain
 Supplies needed:
Scrap Fabric measuring app. 3″ x 26″
Felt in coordinating color
4″ Ribbon
Keychain (Mine were 1 1/2″)
Glue & Glue Gun
This is a perfect gift to have around. I try to keep these around for teachers, bus drivers, friends birthdays, hair dresser, pretty much anyone! My 10 year old even loves hers. So if you’re looking for something to do with all those leftover pieces of fabric, here you go!
To start with, cut out your fabric. I made mine 3″ x 26″. This is no exact science. You can honestly make it any size and it will work out. I ended up with about a 3″ flower. If you want it bigger, make your fabric larger, likewise if you want it smaller, make your fabric smaller.
Then, fold your fabric in half.
 Tie a knot in one end.

Now hold the small end with the knot. You are going to twist your fabric and then wind it around the knot. The tighter you wind
the smaller it will be. I like to try to twist my fabric so the edges are on the inside and not seen but honestly I’m sure I’m the only one that notices them anyway! I like to put a few dobs of glue as I go to help hold the fabric in place.
Next take your ribbon and fold it around the key ring. Glue the edges together.
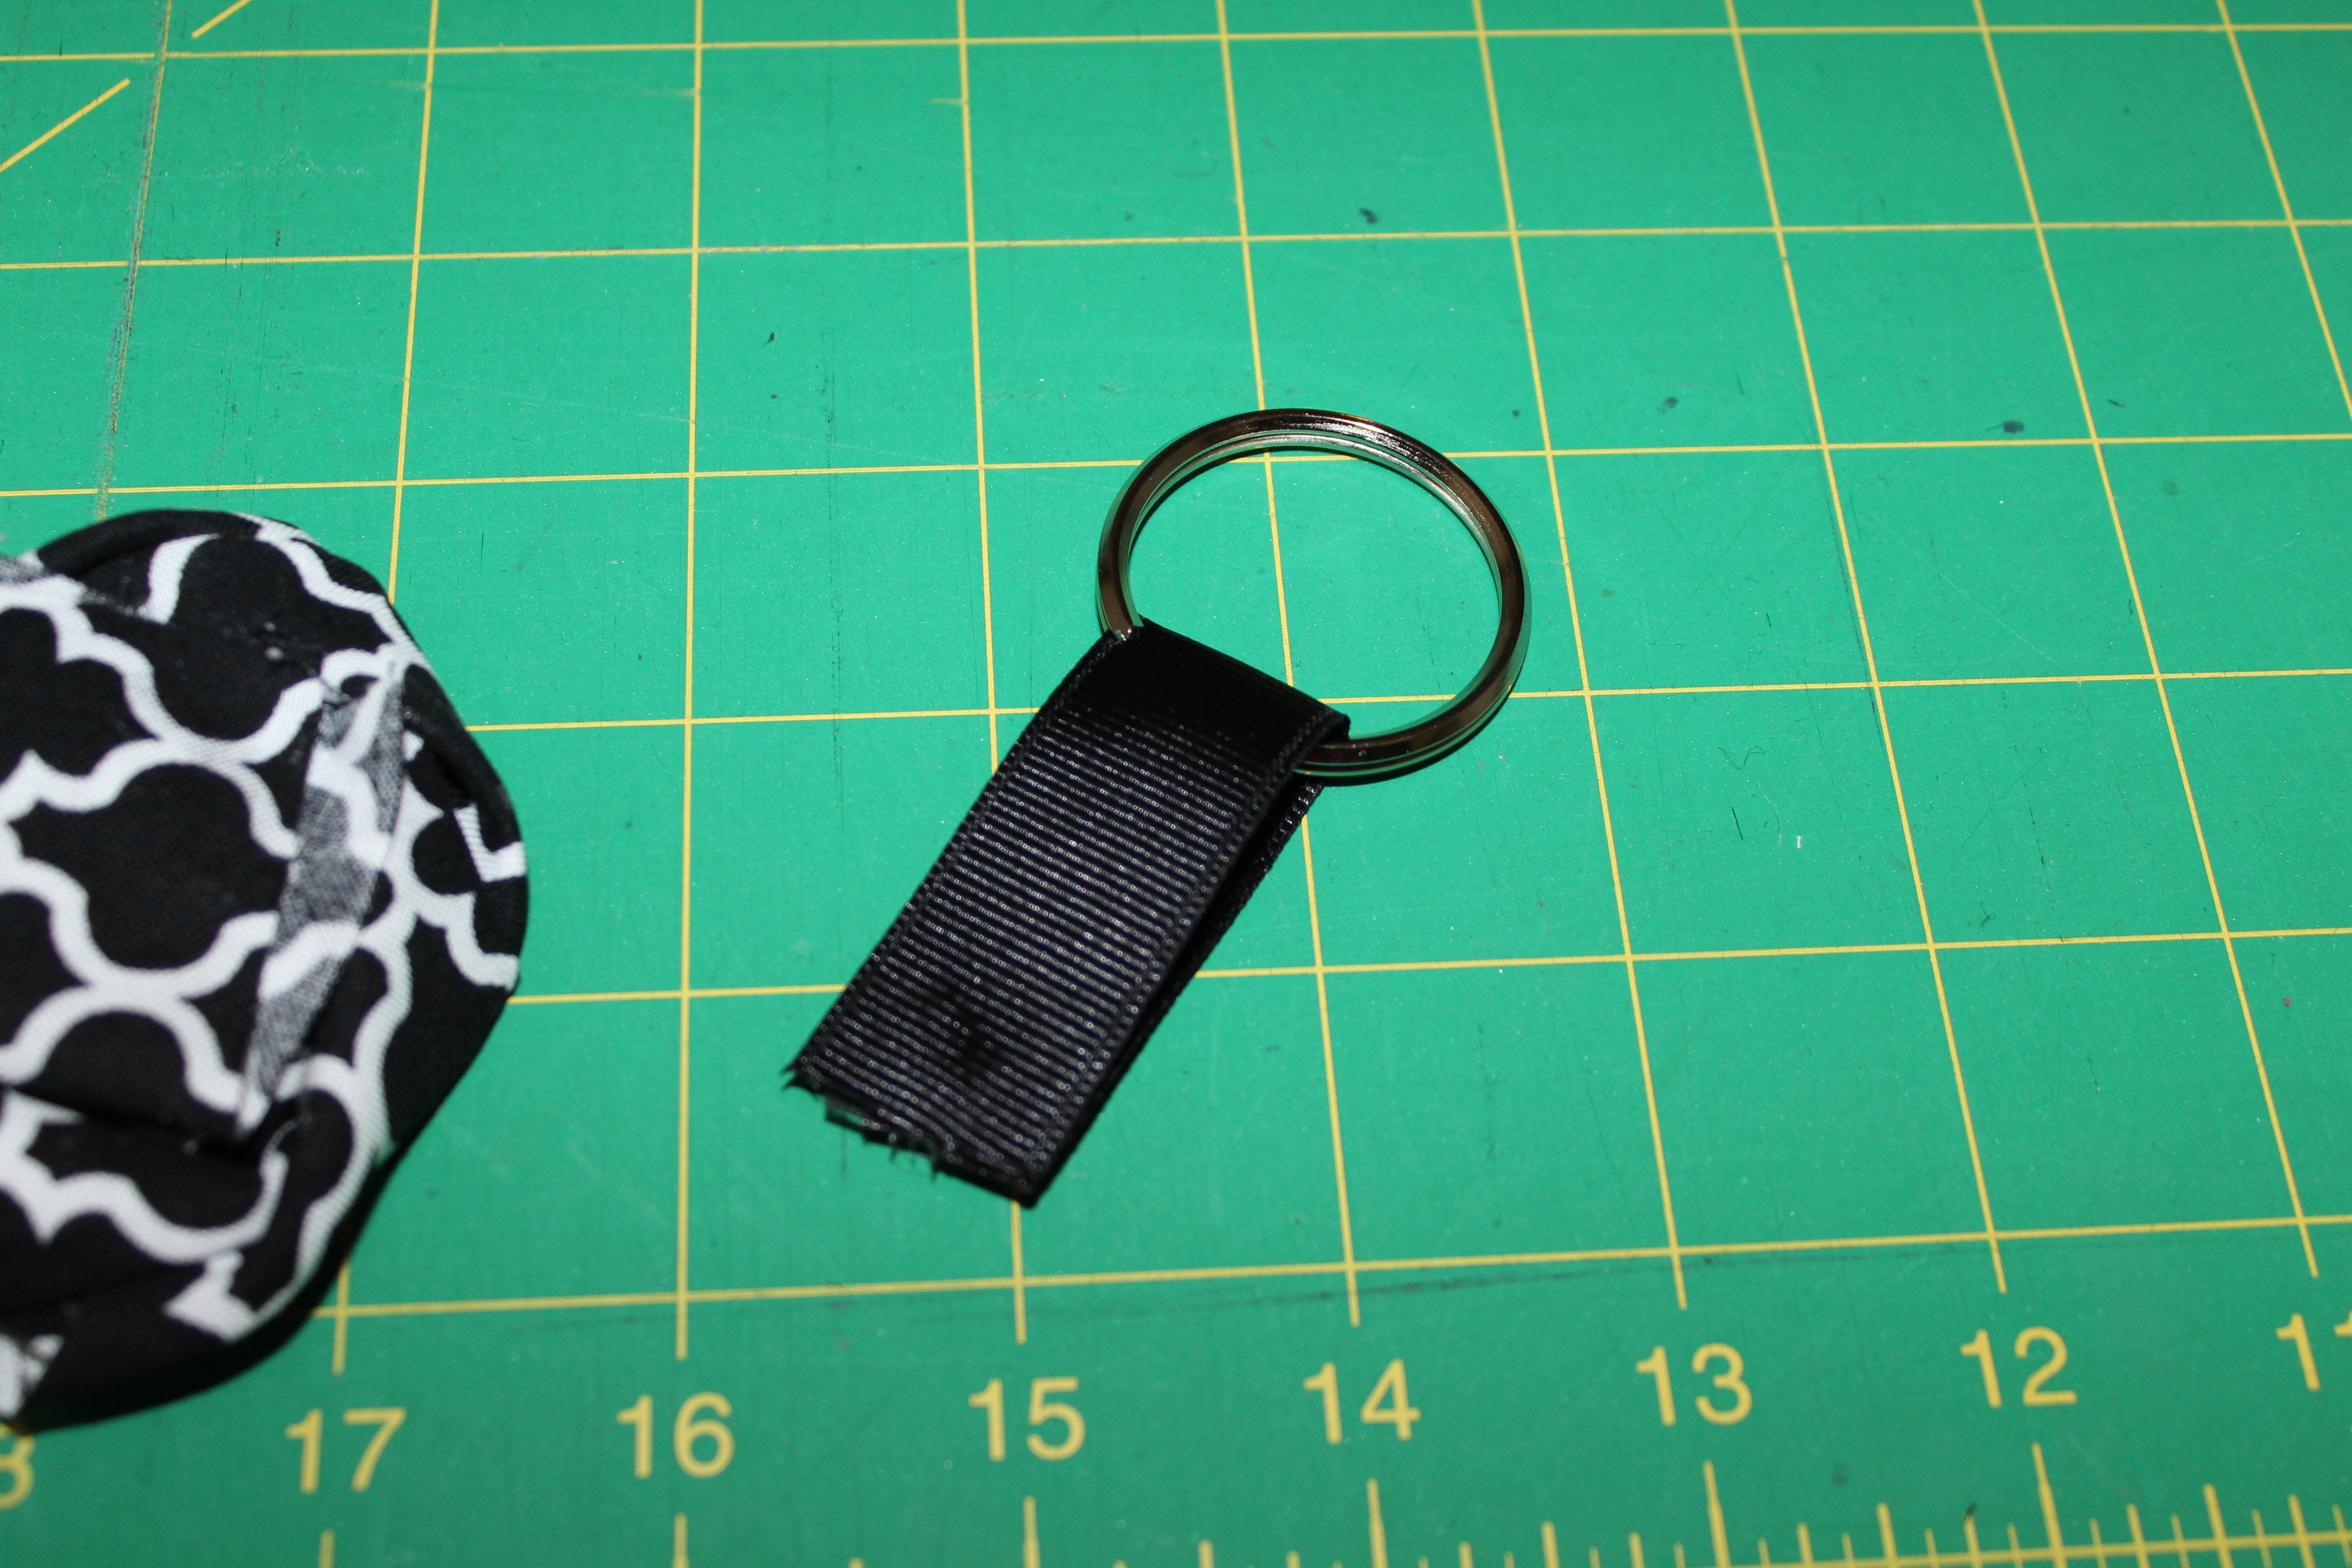
Place your felt on the back of the flower and cut around it so it’s the exact size. Then glue the bottom edge of the ribbon between the fabric and the felt. This just finishes the back and helps make the keychain stronger.
 And you’re done! It’s really even easier than it looks! I did this a couple of years ago when I was the craft coordinator at my MOPS group. It was a hit. They made several each and were able to give them as gifts.
Cupcake Toppers for a Gender Reveal Party

I found a cute idea for a wreath for a gender reveal party….coming soon! So I decided to add some free printables that match as well. Just print these out on cardstock, glue 2 back to back with a popsicle stick in the middle. Then stick the popsicle stick in the cupcake. So cute! More free printables and the wreath will be coming soon. So keep watching!

Fathers Day Free Printable

Fathers Day is only 2 weeks away! This printable would make a great card or be adorable in a frame. Hope you enjoy!

